TRIPLE BERRY CHIA JAM

If you've never made your own jam, it is a must do! It's so simple to make and better than any jam I've ever eaten. I can eat it right out of the jar! It's a great way to use those fresh or frozen berries you have on hand. I seem to always have a mix of fresh berries on hand these days to add to my muesli mix, top over ice cream or blend into smoothies of all flavors. I felt it was time to try something new with my berries and ventured out to make a berry chia jam. My first try was a success! You really can't go wrong here at all. The ingredients are minimal and the instructions simple making this an easy staple to make and have on hand. Originally I wanted to make this a 'simply fruit' chia jam but ultimately added a very small amount of pure maple syrup. I love that you have control of what sweetener you use, if you need any at all. My blackberries were so sweet and delicious, which is why they are the main berry here, that I probably would've been fine without any sweetener but added some for good measure. Use the berries in any arrangement you like, even adding strawberries if you like. You could just as easily use one type of berry. This is just a template to use as a guide for whatever berry chia jam you desire. I encourage you to try making a batch for yourself. I've given you 2 ways to make this, either stove-top or raw. Both ways are delicious! Get ready to be amazed at just how wonderful making your own jam can be!

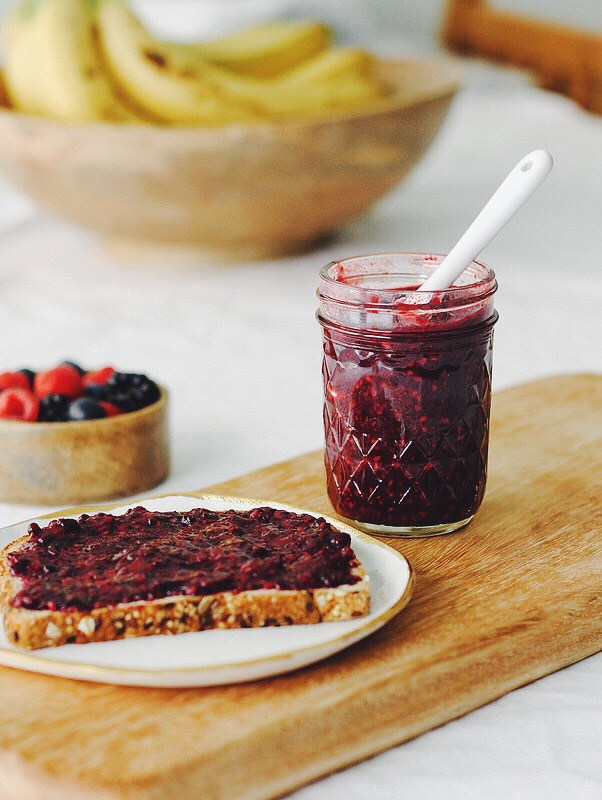
Spread on your favorite toast or a slice of this banana bread. Make a PB & J sandwich using this raw almond butter recipe. Add a dollop to oatmealpancakes or waffles. You can even treat yourself to these oat jam thumbprint cookies. There are many ways to use this lip smackin berry chia jam!

TRIPLE BERRY CHIA JAMTRIPLE BERRY CHIA JAM

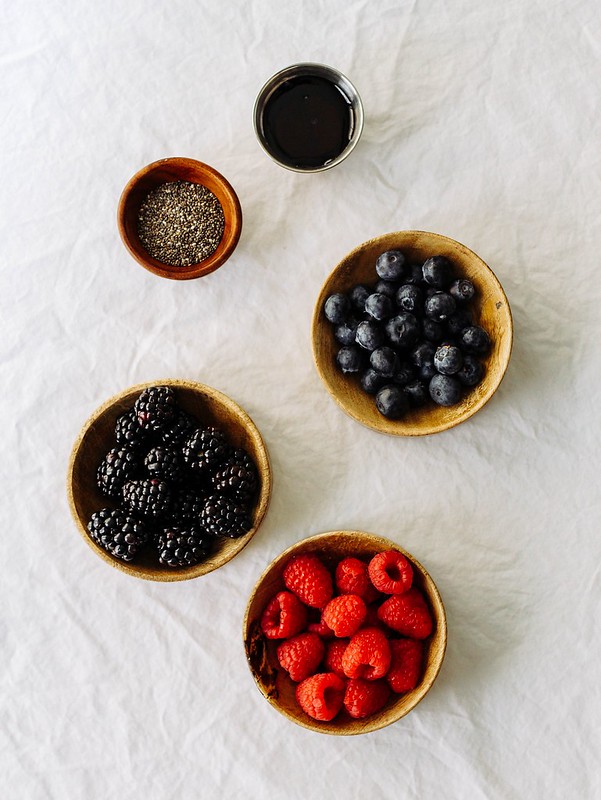
This jam is loaded with powerful antioxidants! Blueberriesraspberries and blackberries are all rich inpolyphenols, essential vitamins and trace elements. Alone these berries are amazing but together they promote optimal antioxidant, anti-inflammatory and anticancer benefits. I highly recommend seeking out organic berries as an added measure of heart smart eating. If you decide to make the stove-top method in this recipe, you can be sure that most of the polyphenols will still be intact.

The chia seeds are also considered a superfood. Although they are used sparingly they will add some omegas while adding textural thickness to the jam.

Recently I watched this TED talk entitled, Can We Eat To Starve Cancer, by Dr. William Li. In a word...YES we can! This has been my food philosophy. I believe prevention is key. The food we eat directly affects every part of our being. Your body is an amazing eco-system and has the ability to ward off and prevent many diseases by simply eating whole foods. In this video Dr. Li will discuss what he has learned about the connection between cancer and angiogenesis. He'll also discuss how foods, and the combining of certain foods, can create an even more powerful healing effect. If you get a moment, it's a pretty informative talk lasting about 24 minutes.

'Let food be thy medicine and medicine be thy food'. - Hippocrates

TRIPLE BERRY CHIA JAM

TRIPLE BERRY CHIA JAM

Ingredients
  • 1 heaping cup blackberries (about 6 oz.)
  • 1/2 heaping cup raspberries (about 3 oz.)
  • 1/2 heaping cup blueberries (about 3 oz.)
  • 1 heaping tablespoon chia seeds
  • 1 tablespoon pure maple syrup

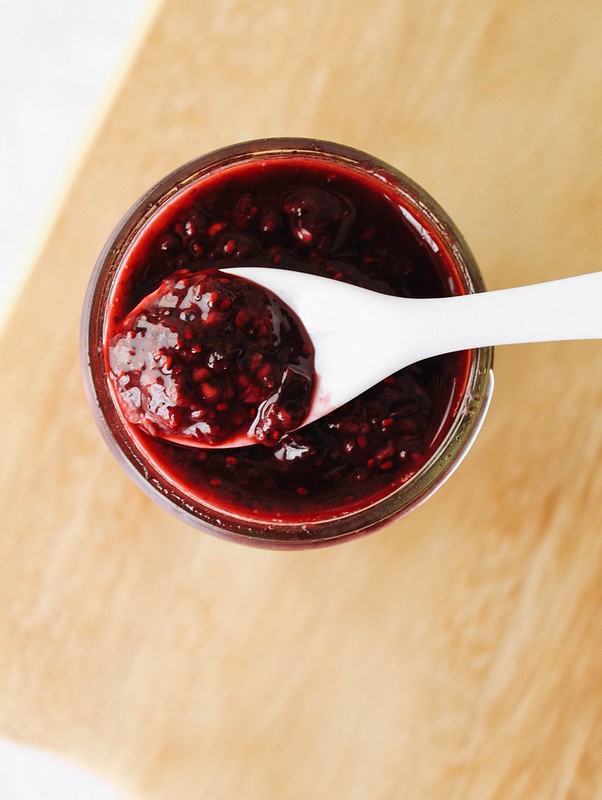
Stove-top: Add berries to a small saucepan, heat over medium stirring occasionally until softened. Using the back of a slotted spoon or fork, mash the berries along the side (or bottom) of the pan. Let mixture come to a gentle boil. The entire cooking time will be from 4 - 6 minutes. Once boiling occurs, remove from heat, add sweetener if needed and slowly add in chia seeds while stirring to combine.

Fill jar and let cool a few minutes. Cover and place in the refrigerator to thicken. Store in fridge. Will last up to 2 - 3 weeks (I've never had it longer than a week, it may even last up to a month).

Raw: Place berries and chia seeds in blender/food processor and pulse until desired chunkiness/consistency. Add maple syrup as needed and blend again.

Fill jar, cover and place in refrigerator to set for a couple hours. Keep stored in fridge and use your raw chia jam within 1 week. 

Makes about 1 - 1 1/4 cup (8 - 10 oz.).

Notes: 

Use any berries you prefer equaling approx. 12 oz. If using strawberries be sure to chop them up before measuring unless using a scale.

If using frozen berries, be sure to let them thaw before measuring.

BASIC HONEY-WHOLE WHEAT BREAD

I know a lot of you are still in the throes of summer heat, however, here in Alaska, mid-August is the beginning of our fall, with night time temperatures in the 40's and day time temperatures between 55 and 65 (we will probably have night time frost in a couple of weeks). Therefore, my thoughts are turning to heartier recipes. If YOUR part of the world is still too hot for baking, I hope that you will bookmark this recipe for YOUR fall season.

NO-BAKE CANDY CAKE


I found this idea on a web site a few years ago (long before I was aware of the blogging world). It is a fun (and easy) project which can be tailored to any age, holiday or special occasion.

Need a gift for someone at work or school? Make them a small version. Make a huge version for a table centerpiece at a teenager’s birthday party. The possibilities are endless.

The “candy cake” pictured was made with a 9” cardboard circle for a base. Since the candy you are going to fill this with is heavy, the base cardboard needs to be pretty rigid, so…if in doubt, double-up your cardboard. If you double up your cardboard, wrap it in foil to disguise it.

Next, I hot glued two (FLAT) 8” Styrofoam wreath circles (craft dept. at Walmart) on top of each other, then wrapped them with wide ribbon (to disguise them) and glued them to the cardboard circle base. Now you should have a flat base with a ribbon wrapped “lip” around the outer edge of the base.

Next, attach mini-candy bars or mini-boxes of candy to the outside of the “lip” by placing a SINGLE SMALL DOT of hot glue on the back of the candy wrapper (use my photo as a guide).


Now fill the hollow area inside of the Styrofoam wreath "lip" with loose, wrapped candies, fill to the top.Next, think about decorating the flat top of the Styrofoam “lip”. You can either glue more candy to it, or push lollipops, blow pops, or any candy on a stick, into the Styrofoam so it will add height (see my photo).

TIP: Plan ahead and make sure all of your candy bars are facing in the same direction. Keep your design or color theme in mind when you are choosing candy bars.


TIP: If you are using hot glue on chocolate bars, remember just one little dot will suffice and if you are concerned about it, freeze them first.

TIP: Do not use any unwrapped candy.
TIP: If giving as a gift, this looks especially festive if you wrap it in clear cellophane and decorate it with lots of curly ribbons.

The hardest part of this project is not snacking on the candy while you are constructing it!!!

BEAR CLAWS

These bear claw pastries are delicious. The dough mixes very easily (no kneading) and the filling for the pastry is equally as easy. The frustrating part is assembly. It is such a sticky dough, that it requires tons of flour on your counter and you have to wash your hands and utensils about every 30 seconds or so to make things work smoothly. Assembly is a little tricky and requires patience; if you can tolerate that annoyance, the final product is worth it. This recipe makes about a dozen nice size pastries, however the dough and filling will keep in the fridge for up to three days, so you do not have to bake them all at once.
PASTRY
1 cup butter
1 tablespoon of dry active yeast
¼ cup warm water
¼ cup white sugar
3 eggs yolks
½ teaspoon salt
(1) small (5 ounce) can evaporated milk
1 ½ cups all purpose flour
Melt the butter and let it cool down to 110 degrees (should only feel good and warm to the touch, not hot). Dissolve yeast in ¼ cup warm water. Mix these two liquids together and add ¼ cup sugar, egg yolks, salt, evaporated milk, and flour. Mix well and cover with plastic wrap and chill in fridge at least 24 hours (or up to three days).


PASTRY FILLING
½ cup butter (room temperature)
1 + 1/3 cups unsifted powdered sugar
2/3 cup all-purpose flour
8 ounces (1 cup) almond paste
1 teaspoon lemon zest
2 egg whites
¾ cup finely chopped almonds
Beat softened butter and powdered sugar until smooth. Add 2/3 cup flour and almond paste. Beat with electric mixer until crumbly and evenly mixed; add lemon zest and two egg whites. Beat until smooth. Stir in ¾ cup finely chopped almonds. Cover with plastic wrap and chill until firm (one to thee days).


ASSEMBLY
Put a nice thick layer of flour on your counter and rolling pin (this dough is STICKY, but you can dust any excess flour off later, with a pastry brush). Roll the dough out to a 20” x 12” rectangle, keeping the edges as straight as possible. Cut the dough (length-wise) into three sections, each about 4” wide.

Flour your counter and hands and roll the almond filling into three 20” “ropes” (the diameter of your thumb). Keep washing your hands because the filling is sticky too! Lay one of the “ropes” in the center of each 20” dough strip and flatten it just a little. Fold the dough over the “rope”, matching the other (cut) edge. Cut each filled 20” strip into 4” pastries (brush excess flour off with a pastry brush) and lay them on a parchment lined baking sheet. With a sharp knife, cut 3 slits in each pastry like this:

Sorry, I forgot to take a photo of this stage, forgive the crude drawing
Flour your knife so it does not stick to the dough and wipe it off often). Use the tip of the knife to separate the “claws” a little. Lightly beat the remaining egg white and brush over the bear claws. top with sliced almonds and sprinkle with sanding sugar. Let pastries raise for 45 minutes and then bake in preheated 375° oven for 15 minutes. Cool on wire rack. Makes about a dozen.

NOTE: I hope I have not scared you away from this recipe. It really is no harder than a simple piecrust, but I felt it only fair to warn you about the sticky dough.
NOTE: I put a simple glaze on some of the pastries and some I left plain. If you have trouble finding sanding sugar (it really adds a special shine and “finish” to baked goods), check Wal-Marts baking isle, near the sprinkles. They sell a Wiltons large grain transparent sprinkle that will work just as well.

PINEAPPLE UPSIDE-DOWN CUPCAKES

These little pineapple upside-down cupcakes are super rich-gooey-yummy. They are easy enough for every-day eating and pretty enough for ANY holiday table. They are SO tasty (and portable) that they disappear very quickly. Recipe makes two dozen.

TACO SEASONING

Make your own taco seasoning!! It is simple, quick, cheap and useful for almost anything. I use it on steak fajitas, tacos, Spanish rice, chicken and much more. It is so much more convenient (and tasty) than the commercial packets.

CARAMEL PEAR UPSIDE DOWN CAKE FOR VALENTINES DAY

I hope you will consider making this caramel pear upside down cake for your Valentine sweetheart. Served warm with a big scoop of vanilla ice cream, it will knock his/her socks off. Fresh Bosc pears, are baked in a homemade caramel sauce while a ginger-cinnamon cake bakes on top. This recipe has a couple of extra steps (to make the caramel sauce) but it is not hard to do. It is the most moist cake I've ever made.


Preheat your oven to 350F and spray a 9" x 2" cake pan with vegetable spray. Line the bottom of the pan with parchment paper and then spray it again.

CROCK POT REFRIED BEANS FOR A CROWD

I have been tweaking this recipe for about a year and I finally have it just the way we like it. It is one of those great recipes that you dump everything in the slow cooker and wait for the magic.

Canned refried beans just don't "do it" for us after trying this one. Honestly, I could just eat this with a spoon right out of the slow cooker...forget the toppings.

1 medium sweet onion (cut in half but not chopped)
3 cups of rinsed (and sorted) DRY pinto beans
2 tsp. salt
1 tsp. black pepper
3 tsp. chili powder
6 slices of crisp bacon (crumbled)

1 tsp. ground cumin
(1) 4 ounce can green mild chiles
½ fresh jalapeno (seeded and chopped)
9 cups water

Put everything in the crockpot and cook on high for 8 hours or till tender. Drain but reserve liquid. Put drained bean mixture into the food processor and puree, adding just enough of the reserved bean liquid to make the beans the right consistency. Keep warm in the crock pot.


NOTE: No need to pre-soak the beans


NOTE: Check the beans after 6-7 hours, if it looks like they are losing too much liquid, add another cup of water.

NOTE: I put the cooked onion (from the crockpot) in the food processor with the beans. A few pulses and it disappears.

NOTE: It's up to you how finely you puree the beans. If you like your refried beans a little chunky, just pulse them a few times.
NOTE: I use a medium size sweet onion, like a Vidalia
NOTE: Leave out the bacon if you are going vegetarian.

BEER BATTERED HALIBUT with (TWICE FRIED) FRENCH FRIES

Most people in our part of Alaska have halibut in the freezer. Whether they caught it themselves, or (like us) they have a generous neighbor who is an avid fisherman...it is a delightful mid-winter staple. Fish & Chips is one of Hubbies all time favorites and it is very quick to make.

OPEN FACE SURIMI MELT SANDWICHES

I don't want this to sound like a commercial, but I would like to say something about Alaskan surimi (I get the impression some people aren't familiar with it). Surimi is made from boneless, skinless Alaskan Pollock fillets that are cooked and flavored with crab meat, then pressed into various shapes. Surimi can be used in place of crab or shrimp in almost any recipe. It comes in 12 ounce and 16 ounce vacuum packed pouches. Just make sure it says "made from Alaska Pollock" because I can not vouch for any other kind.

I use surimi because it is not only economical, but it comes pre-cooked and is great for a super-fast meal (hot or cold). This open face surimi melt sandwich is quick, filling and easy.

Surimi Melts
12 ounce package of crab flavored surimi (flake style)
1/2 cup chopped celery
1 tablespoon chopped chives or green onion
1/3 cup low fat mayonnaise
2 teaspoons Dijon mustard
1 teaspoon lemon pepper
3 slices of bacon fried crisp
3 English muffins split in half
2 cups shredded cheddar or pepper-jack cheese

Rough chop the surimi and mix it with the chives, mayo, Dijon, lemon pepper, crumbled bacon and 1 cup of shredded cheddar or pepper-jack cheese until well blended.

Lightly toast the split English muffins and then top with the surimi mixture (divided equally).
Top mixture with the rest of the shredded cheddar (or pepper-jack) and broil these open face sandwiches until the cheese is melted and the sandwich is hot.

NOTE: Makes six sandwiches, 300 calories each.

MUSHROOM & CHEESE STUFFED HAMBURGERS with HOMEMADE BUNS

Spring is here (even here in Alaska) and thoughts turn to outdoor barbeque's and camping. I’m always on the lookout for easy recipes that will “hold up” well in the cooler and Mushroom Stuffed Hamburgers is a good one. You can make the patties ahead of time and freeze them solid (which will help insure food safety while you travel.) Just throw these frozen patties on the grill and pair them with homemade hamburger buns (recipe follows) and you have a delicious cookout!
Can you tell that someone in my house loves mayo? LOL
(makes 4 hamburgers)
1 pound of lean ground beef
1 egg
2 tablespoons finely chopped onion
¼ cup dry bread crumbs
2 tablespoons ketchup
1 teaspoon Worcestershire sauce
¼ teaspoon black pepper
8 ounces of fresh mushrooms (sautéed)
favorite cheese
Each of these hamburgers is made out of two thin patties with mushrooms and cheese sandwiched in between. So mix everything (except the mushrooms & cheese) and make 8 thin patties. Top four of the patties with sautéed mushrooms and your favorite cheese and then a 2nd thin patty, pressing to seal the edges well. Repeat for the other three hamburgers.

If you are going to freeze these, wrap each one individually in plastic wrap and lay them flat on a cookie sheet to freeze. When they are frozen, you can stack them in a freezer Ziploc bag. Whether you are taking these on a camping trip or just leaving them in the freezer for a quick weeknight meal, they taste great.

HAMBURGER BUNS

This recipe will make at least 2 dozen hamburger buns. Once baked, they freeze extremely well. I find myself using them for everything from breakfast sandwiches to peanut butter sandwiches.
5 cups of all purpose flour
2 packets of dry active yeast (I use 2 tablespoons)
3 tablespoons sugar
3 tablespoons vegetable oil
1 tablespoon salt
2 ½ cups very warm water


In an electric stand mixer, place 2 cups of flour, yeast, sugar, oil and salt (stir to combine dry ingredients) Add 2 ½ cups of very warm water (see note). Stir quickly while you add the water. Let this mixture sit for about 10 minutes.

Add the rest of the flour, about ½ cup at a time, scraping the sides of your bowl and dough hook each time. Every time you stop your mixer, turn all of the dough mass over. Let your machine knead this dough until it CLEANLY comes away from the side of your mixer. If you have added all 5 cups of flour and it has not come cleanly away from your bowl, you need to add just a little more flour.

Once the dough comes cleanly away from the sides of your bowl, let the machine knead it for about five more minutes. Remove the dough and grease the bowl. Return the bread to the greased bowl and grease the top of the dough. Cover the dough with plastic wrap and let it rise for an hour (it will more than double in volume).

Punch the air out of your dough and let it rest (covered) for 15-20 minutes. This step is important because your dough will “behave” much better while you form it, if you follow this step. Pinch off pieces of dough about the size of a tangerine. Make each ball as round as you can. Roll each ball into a 5” circle. Resist the temptation to add more dough to make a thicker bun. At this stage, your buns need to be a lot thinner than you think. (about ½” thick). If you add more dough, you are going to end up with a burger bun the size of your face!

Place the formed buns on a greased baking sheet and spritz the top of the dough with just a little cooking spray. Cover with plastic wrap and let rise for about 45 minutes. Bake at 400° for 15-16 minutes.
If you are going to freeze these buns, let them cool completely first and freeze as soon as possible. About 4 to 5 minutes in a 350° oven will heat a frozen burger bun and make it taste like it was just baked.

This recipe also makes excellent sandwich bread

APPLE TART

There is nothing quite as American as apple pie, isn’t that the old adage? I started experimenting with apple pie recipes many years ago because it is one of my husbands favorites. This recipe is pretty easy, as pies go; it has a no-roll shortbread type crust and you pre-cook the apples so they bake quicker. I like this recipe because it makes a pretty presentation and it is baked in a two piece tart pan, so you can just life the tart out of the pan and set it on a pretty serving plate.
Back to top