MASHED CHICKPEA & AVOCADO SANDWICH

MASHED CHICKPEA & AVOCADO SANDWICH

Happy New Year 2015! It's been a few long weeks since my last post. I hope everyone had a wonderful holiday and happy new year! It feels good to be back bringing you some healthy inspiration to start your new year. I'm starting the year off with this most delicious mashed chickpea & avocado sandwich. I love my chickpeas salads and have quite a few of them in the recipe collection for good reason. They are easy, healthy and filling. If you're already familiar with the other chickpea sandwiches, this will be a nice change up for you (if you're not you should definitely take a look). Chickpeas & avocados are a winning combination, add in a few other ingredients and it's a match made in heaven! Not in the mood for bread? Try serving this over a bed of leafy greens instead. Either way I know you're going to love it!

If you haven't already, you may like to pick up a copy of the 'The Archives' E-cookbook! It's a collection of 250+ timeless whole food vegan recipes for you to have at your convenience always. I personally have it downloaded on my iPad mini and use it often in and out of the kitchen. It's so handy to have when your internet is unavailable and is much faster to use. Start your new year off with this invaluable resource of healthy & simple recipes to keep you feeling your best throughout the year! And be sure to subscribe to the blog for new recipes and inspiration as soon as they're available. Cheers to a happy and healthy new year!
MASHED CHICKPEA & AVOCADO SANDWICH

MASHED CHICKPEA & AVOCADO SANDWICH

Ingredients 
  • 1 1/2 cups cooked chickpeas or 1 can (15oz.), drained and rinsed
  • 1 avocado, seed removed
  • 1 small carrot, diced
  • juice of 1 lemon
  • dollop of hummus, optional
  • dash or two of garlic powder
  • mineral salt & fresh cracked pepper, to taste

To serve
  • leafy greens
  • 6 slices bread of choice
  • red onion slices

In a medium size bowl, add chickpeas and roughly mash with the back of a strong fork. Add avocado and mash together well. Add in carrots, lemon juice, hummus, garlic powder, salt and pepper, mix to combine.

Layer your bread slices with leafy greens, onion and a nice helping of the mash. Top with remaining slice and enjoy!

Serves 3

Notes:

Sliced tomato would pair nicely in the sandwich.

Try adding a small handful of pepitas (pumpkin seeds) or sunflower seeds to the mash for extra nutrition and crunchiness.

If needed, add a dollop of hummus, it pairs well and will act as a binder.


Fresh from the Oven: Soft Pretzel Bites

Soft Pretzel Bites

Sometimes a craving will come over us and we just must oblige. That was the case here; I was craving pretzels and wanted to make bite size or at least three bite pretzels bite. They're actually more like a mini pretzel loaf and very rustic looking. Originally, I wanted to make this a gluten free version but unfortunately they did not come out good at all so I decided to try out a version using whole wheat and spelt. To my thankfulness these came out great. They have a somewhat firm crust and a nice soft center and good chew along with a wonderful pretzel flavor. I tried making these two ways, well actually three ways but the gluten free way didn't work, and I much rather prefer the latter for this beautiful crust and pretzel flavor that my prior batch did not have. The trick was the baking soda bath, that made all the difference. Although if you skip this step and just place the pretzel bites in the broiler for a minute or so you will get a pretty color but nothing like these, even the bottoms were caramel color and I didn't even flip them.

I've included spelt flour in this recipe to break up the whole wheat density a bit. I've read up on spelt and have used it in a few of my recipes, pancakes to be exact. Spelt is a great replacement for whole wheat and all-purpose flours whenever possible for the majority of us. For those with wheat allergies, spelt is a good replacement for other wheat flours. Even though it is in the wheat family it has a different molecule makeup. It even contains more protein than wheat and its nutrients are easily digestible. As for using spelt in breads, I have seen some great yeast breads using all spelt that have come out beautifully and it works here too with this yeast bread. Try some spelt pancakes too, it has a slightly nutty and sweet flavor, you may never go back to regular flour again.
We all have different tastes and so I encourage you to try this recipe using the various flours to see which ones you like best. This will work with all whole wheat bread flour, unbleached bread flour, even all spelt flour or any combination. If you like making your own pretzels, try the different flours. I will surely tell you that all of your experiments will be tasty ones...

Soft Pretzel Bites

Fresh from the oven: Soft Pretzel Bites

Ingredients
  • 1 1/4 cup warm water (100°F - 110°F)
  • 2 teaspoons + 2 tablespoon pure cane sugar, divided
  • 1 packet active dry yeast
  • 1 1/2 cup whole wheat bread flour
  • 1 cup spelt flour
  • 1 teaspoon sea salt (I like to grind mine fine by using a mortar stone)
  • 2 teaspoons olive oil
  • 1/4 cup baking soda
  • olive oil, for brushing
  • pretzel salt or any salt as topping (I used garlic sea salt)

Pour warm water and 2 teaspoons sugar into bowl of food processor fitted with dough attachment, or an electric mixer fitted with a dough hook. Alternately, you can mix this entire dough mixture in a medium size bowl without any equipment at all while saving washing. Stir water and sugar to combine, sprinkle with yeast and let sit for 10 minutes; yeast should be foamy.

Add 1 cup flour to yeast, mix until combined. Add salt and rest of flour, mix until combined, about 30 seconds. Beat on medium-low until dough pulls away from the sides of the bowl, about 1 1/2 minutes. If dough is too dry add more water 1 tablespoon at a time and if dough is too wet, add more flour 1 tablespoon at a time (this may all depend on weather conditions). Blend for another 30 seconds. Transfer to a lightly floured board and knead about ten minutes, or until smooth.

In a large bowl, pour oil and swirl to coat sides. Bring dough into the bowl, turn completely to cover all sides with oil. Cover with kitchen towel and leave in a warm spot for about 1 hour or until dough has doubled in size.

Heat oven to 450 degrees. Lightly grease baking sheet with coconut or olive oil (parchment and ungreased works too), set aside. Punch down the dough in the center to remove bubbles. Lightly flour a board and transfer the dough. Knead once or twice, pull off little sections rolling into a 1 1/2 inch ball or oblong shapes. Let the shapes rest until they rise a little, about 15 minutes. 

Next, fill a large, shallow pot with 2 inches of water. Bring to a boil. Add baking soda one tablespoon at a time (it will foam up so be gentle when adding). Add remaining 2 tablespoons sugar. Reduce to a simmer; place half of the bites in the water and poach for 45 seconds on each side. Use slotted spoon to transfer pretzel bites to baking sheet. Continue until all pretzels are poached.

Using a sharp knife slash a shallow cross or straight line across the top of each pretzel bite. With a silicon brush, coat the pretzel bites with olive oil and sprinkle with salt of choice. Bake until golden brown, 10 - 12 minutes or so. Let cool on wire rack, or eat warm. Coat with olive oil once more before eating if desired and sprinkle a little more salt. Pretzels are best when eaten right away or the same day. You can keep left over pretzels at room temperature, uncovered, for one to two days. Do not store in covered container or they will become soggy.

    Serve plain or with your favorite accompaniment. I used dijon and whole grain mustard.

    Makes approx. 16 to 20 


    Enjoy!


    Just for reference, here is my first batch. I used 1/12 cup wheat bread flour and 1 cup spelt in these. I also did these without soaking as I was using another recipe which called for setting them under the broiler for about 1 minute to get a golden color. Although these were very tasty, they still didn't have the pretzel flavor that I was looking for. These were great dipping into olive oil though...it went well with the garlic salt I topped them with. They are more of a bread than a true pretzel.


    Recipe adapted from Smitten Kitchen


    No-Knead Artisan Bread: Long Rise


    I have seen some beautiful breads come from this recipe. Rustic with the wonderful characteristics of the breads you see in some of the great bakery houses. I'm really excited to have a couple basic artisan recipes to work with, each one having their own characteristics. I love the short rise version too using a pizza stone and have made a few nice loaves with that. This is a long rise recipe which gives it a great flavor and only uses 1/4 teaspoon yeast. The longer rise gives the flavors time to really develop..and using the covered pot in the oven again gives this bread a somewhat difference over the short rise method of baking. Both ways are great in their own way.

    The bread shown here has a nice textured crumb with a wonderful crusty shell. So good straight from the oven. I toasted some up and paired it with a Spicy Carrot & Hummus Sandwich the other day and it was absolutely delicious! I also had some of this toasted with a chickpea salad and again, really great bread. I can't say I have a preferred method yet as I'm just learning to play with the recipes and share my outcomes with you but I will say that the long rise is most likely going to come out ahead.


    With winter coming, the soups of the season will need a good accompaniment. These breads will do just fine soaking up the juices and getting the last bits at the end. With only four ingredients and being simple to put together, making bread at home will be a pleasure. You can even make a large batch and store some dough in the fridge for up to a couple weeks, taking a grapefruit size piece at a time to make a fresh loaf while cooking dinner. You can vary the flours creating different flavors to pair with your dishes, as each flour adds a different taste and texture. I will be working on perfecting my technique of achieving that gorgeous chestnut color like Jim Lahey creates in his bakery. Adding in some herbs from time to time will also make this even more incredible. Lot's of possibilities here! I have included a video on how to make this straight from the master himself, Jim Lahey. I highly recommend watching that before making the bread. You may also want to consult his original recipe I have included below as well. The following recipe is from The New York Times...

    Adapted from Jim Lahey, Sullivan Street Bakery
    Time: About 1½ hours plus 14 to 20 hours’ rising

    3 cups all-purpose or bread flour, more for dusting
    ¼ teaspoon instant yeast
    1¼ teaspoons salt
    1 5/8 cups water (1  cup + 1/2 cup + 2 tablespoons) (I used 1 1/2 cups)
    Cornmeal, flour or wheat bran as needed. (I also used some oats)

    1. In a large bowl combine flour, yeast and salt. Add 1 5/8 cups water, and stir until blended; dough will be shaggy and sticky. Cover bowl with plastic wrap. Let dough rest at least 12 hours, preferably about 18, at warm room temperature, about 70 degrees. 

    2. Dough is ready when its surface is dotted with bubbles. Lightly flour a work surface and place dough on it (it helps to use a rubber spatula to remove the dough, scrapping the sides down while the bowl is tilted); sprinkle it with a little more flour and fold it over on itself once or twice. Cover loosely with plastic wrap and let rest about 15 minutes.

    3. Using just enough flour to keep dough from sticking to work surface or to your fingers, gently and quickly shape dough into a ball. Generously coat a cotton towel (not terry cloth) with flour, wheat bran or cornmeal; put dough seam side down on towel and dust with more flour, bran or cornmeal. Cover with another cotton towel and let rise for about 2 hours. (I placed my dough on parchment paper covered with flour, sprinkled more flour on top of my dough so towel wouldn't stick and laid a towel over for the 2 hours) When it is ready, dough will be more than double in size and will not readily spring back when poked with a finger.

    4. At least a half-hour before dough is ready, heat oven to 450 degrees. Put a 6- to 8-quart heavy covered pot (cast iron, enamel, Pyrex or ceramic) in oven as it heats. When dough is ready, carefully remove pot from oven. Slide your hand under towel and turn dough over into pot, seam side up; it may look like a mess, but that is O.K (Here I lifted the edges of the parchment paper with dough and placed it straight in the pot). Shake pan once or twice if dough is unevenly distributed; it will straighten out as it bakes. Cover with lid and bake 30 minutes, then remove lid and bake another 15 to 30 minutes, until loaf is beautifully browned. Cool on a rack.

    Yield: One 1½-pound loaf. 

    Notes: 
    My loaf consisted of 2 cups organic unbleached wheat bread flour & 1 cup whole wheat flour. Next time I will start the oven at 500 degrees to get it hot and reduce it to 450  or 475  after I put the bread in. I also forgot to slash the top before baking, this recipe doesn't call for it but it really gives it that rustic feel. Using the parchment paper keeps the mess to a minimum with pretty much the same results...as with anything, the more practice, the better we get and find the little tricks that work best individually. 


     Youtube video with Mark Bittman & Jim Lahey for No Knead Bread...takes 5 minutes to watch and is helpful!


    Recipe from New York Times: Recipe-No Knead Bread


    Original recipe from Sullivan Street Bakery: No Knead Bread

    Here is my other recipe for No Knead Artisan Bread: Short Rise....I would suggest taking hints from both recipes and creating something unique and wonderful to suit your needs. Together these recipes will give you great fresh bread whenever you want it.

    Here is an article from Huffington Post about the different uses of flours you may find helpful...Flour Guide: Which Types To Use For Baking


    Bring on the winter and the soups...

    Happy bread baking....Enjoy!

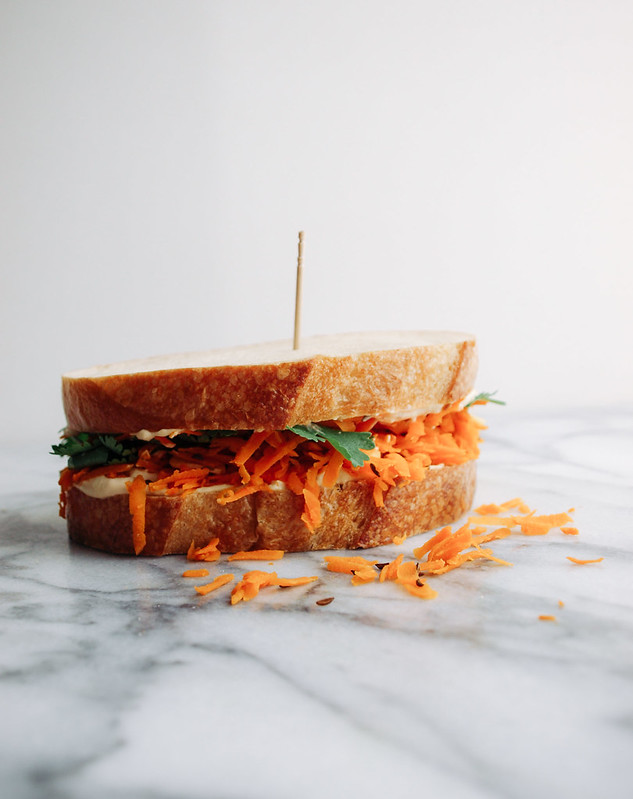
    SPICY CARROT & HUMMUS SANDWICH

    Spicy Carrot & Hummus Sandwich

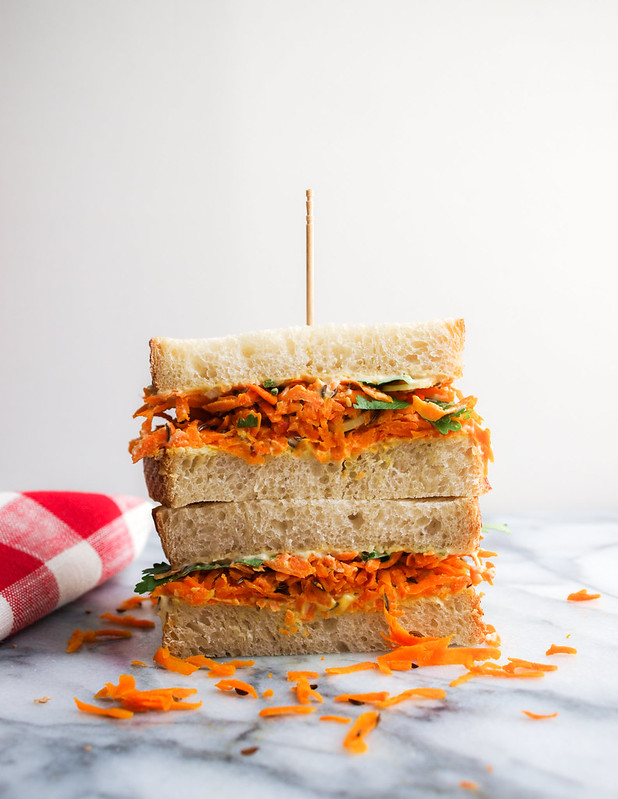
     I am loving making my way through all the wonderful plant based meals I come across. This sandwich was completely lovely...and I used my own homemade bread too! How does it get any better than that. What a great sandwich idea and good use for some caraway seeds, they are delicious. I would have never thought of this myself so thank goodness my eyes are always open for the next inspiration, and there is a lot of inspiration out there.

    This sandwich was created by the British chef, Nick Sandler, for Paul, Stella & Mary McCartney's book, The Meat Free Monday Cookbook. I adapted it from Spicy Carrot Sandwiches from Food & Wine. It's a minimal ingredient recipe full of terrific flavor. Add this to your must try list, you will not be disappointed!

    Spicy Carrot & Hummus Sandwich

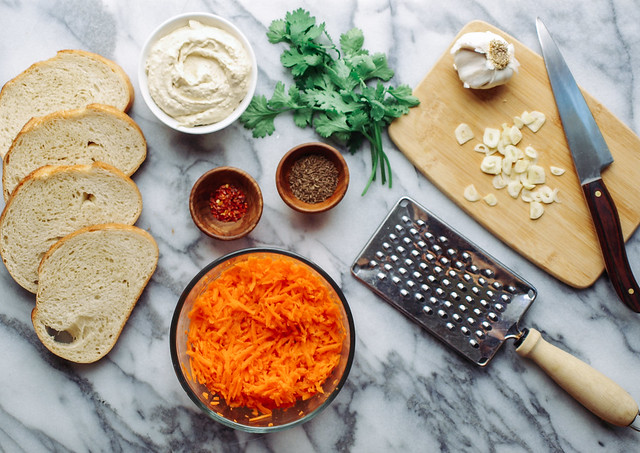
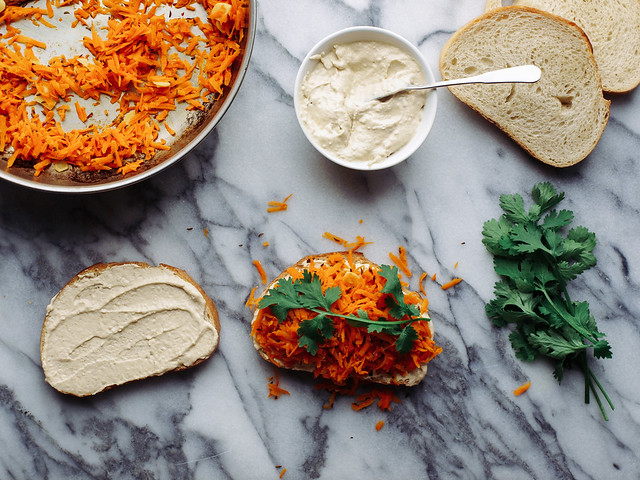
    Grate your carrots, slice your garlic and gather the other ingredients...

    Spicy Carrot & Hummus Sandwich

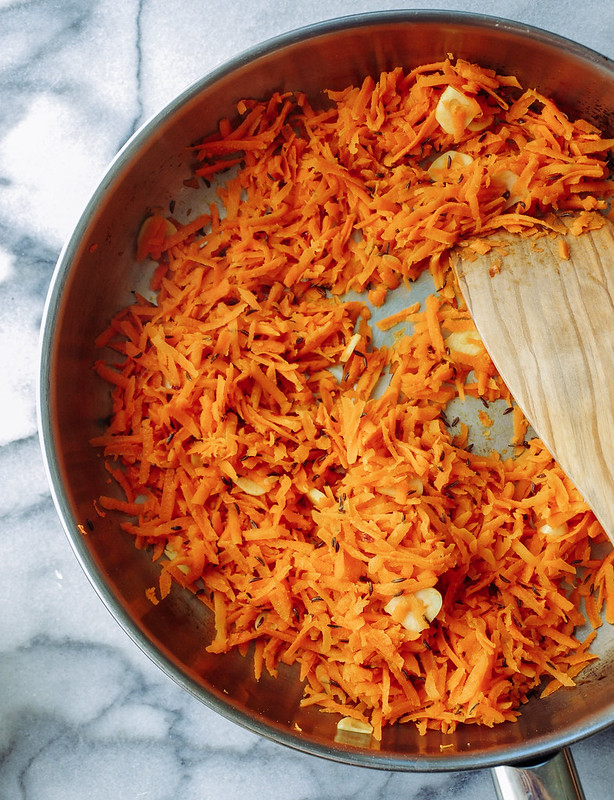
    Saute the few ingredients...

    Spicy Carrot & Hummus Sandwich

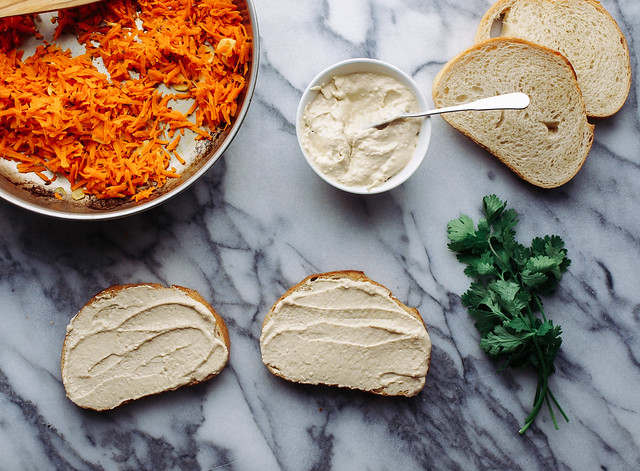
    Toast your bread, spread hummus on both sides...because hummus is amazing!

    Spicy Carrot & Hummus Sandwich

    Add your carrot mixture along with a few spigs of cilantro...

    Spicy Carrot & Hummus Sandwich

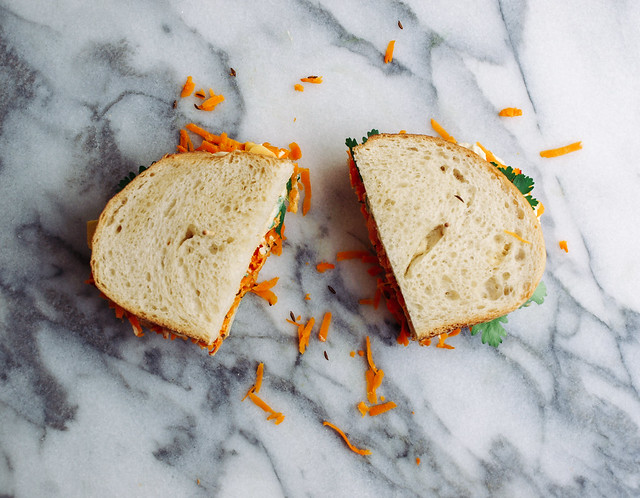
    Slice in half and that's it...a great sandwich any time of day!

    Spicy Carrot & Hummus Sandwich

    SPICY CARROT & HUMMUS SANDWICH 

    Ingredients
    • 2 - 3 large carrots, coarsely crated
    • 2 garlic cloves, thinly sliced
    • 1 teaspoon or so caraway seeds, cumin would be nice too
    • 1 tablespoon extra virgin olive oil
    • pinch red pepper flakes
    • himalayan/mineral salt, to taste
    • four slices bread of choice...french, sourdough, rye or whole grain would pair nicely
    • hummus to spread
    • cilantro
    • cracked pepper, optional

    In skillet heat oil on medium, add the carrots, garlic, caraway seeds and season with salt and red pepper. Cook until carrots have softened, about 4 minutes. Let cool.

    Toast or grill your bread, layer with hummus (I do both sides because I have hummus love). Add carrot mixture, top with cilantro and season with black pepper...serve. Makes two servings.

    Notes: 

    To make your own fresh, four ingredient, no knead bread, check my recipe here: No Knead Artisan Bread: Short Rise and/or No Knead Artisan Bread: Long Rise


    Enjoy!


    No Knead Artisan Bread: Short Rise


    Nothing better than a rustic homemade bread. Especially when it's this easy to put together. It came out with a nice crispy crust and soft flavorful center. This recipe is also versatile. Turn this into a french bread by using all-purpose flour...or make it a whole wheat loaf. You can also replace the water with a vegan buttermilk (1 cup water + 1 tablespoon lemon juice or 1 teaspoon apple cider vinegar). I can't wait to play around a little more with this recipe. You can add herbs, spices or other ingredients like sliced onions, garlic, sun-dried tomatoes, olives, etc. making for an even more flavorful loaf. I've been on a caraway kick lately so I'll be trying a loaf with some caraway seeds soon. This artisan loaf is great for sandwiches, toast & bread bowls...could even be used for a pizza crust.

    This is the first of two breads I have planned...I will be posting a long rise version soon which is acclaimed by many to be the best. Here it is: No Knead Artisan Bread: Long Rise

    • • • • •


    A little about this recipe as taken from Mother Earth News...

    The Master Recipe

    The artisan free-form loaf called the French boule is the basic model for all the no-knead recipes. The round shape (boule in French means “ball”) is the easiest to master. You’ll learn how wet the dough needs to be (wet, but not so wet that the finished loaf won’t retain its form) and how to shape a loaf without kneading. And you’ll discover a truly revolutionary approach to baking: Take some dough from the fridge, shape it, leave it to rest, then let it bake while you’re preparing the rest of the meal.

    The original recipe says it makes four one pound loaves. You can refrigerate the extra dough and pull some out when your ready to make another loaf. Shape it into a boule, or you can shape it into logs or braids. I cut this recipe in half for myself using it for one loaf. I have included my measurements below along with my choice of flours. I think using the whole wheat flours made it a bit denser. I'm looking forward to playing around with these two recipes until I get the variations perfected.

    Be sure to check out the Mother Earth News link, it is full of ideas and information for this recipe and more.


    No Knead French Bread

    Original recipe: 
    • 3 cups lukewarm water
    • 1 1/2 tablespoons active dry yeast
    • 1 1/2 tablespoon coarse salt
    • 6 1/2 cups all-purpose flour


    I used this halved recipe for loaves shown: 
    • 1/ 1/2 cups lukewarm water
    • 1 packet active dry yeast
    • 2 teaspoons himalayan salt
    • 2 1/4 cups whole wheat flour
    • 1 cup spelt flour

    In a very large mixing bowl combine the water, yeast and salt. If adding herbs, now is a good time...use a teaspoon or so of your favorite herbs or double if using fresh. Add flour all at once and stir with a wooden spoon. Takes only a minute if that. You don't need to knead, just mix...you're not looking to make it come together into a dough ball. It will come together as it rises. You just want everything mixed well, no streaks of flour left...then your done.

    Cover container loosely, I used a towel to cover. Let it rise and then fall a bit...may take anywhere from two to four hours depending on temperatures. I gave it three hours and moved on to the next step. At this point you can store any portion of your dough in the fridge or make your bread.

    Dust your hands and flat surface with flour, or cornmeal, so it won't stick. Take your dough, about the size of a grapefruit if only using a portion, and place it on the floured flat surface, gently pull the sides of the dough toward the bottom, rotating the dough until you get a roundish shape with a smooth surface. You could just as easily do this in the palm of your hands without using a flat surface but I like the bottom to have some cornmeal/flour on it, this is a good time to get that in. Also, don't worry if the bottom is a little bunched, it will flatten out upon the second rising.

    Place your dough ball onto a flat surface lined with parchment paper (if not using parchment paper, place on flat surface dusted with cornmeal or flour), and let it rest for at least 40 minutes. No need to cover it. If the dough has been refrigerated, it helps to let it rest a little more, until it's no longer chilled. 

    Twenty minutes before you're ready to bake, put a cast iron skillet, pizza stone or large oven safe pot/skillet in the middle rack of your oven, this will be your baking utensil. Also place a rimmed cookie sheet or roasting pan in the the bottom rack (this is for one cup of water that will be added later). Preheat oven to 450 degrees. Dust some flour on top of your loaf, and slash the top about 1/4 inch deep cross, tick tack toe or scallop pattern (this helps the bread expand when baking while also giving it a rustic look). 

    After twenty minutes of preheating, it's time to bake. Gently place your dough along with the parchment paper (if using) onto your preferred baking dish (I used a pizza stone). I have also used a large pot in the past. Once that's done, quickly pour 1 cup of hot tap water into the cookie sheet/roasting pan and close the oven door to keep the steam inside. Bake for about 30 - 40 min, until you get a nice brown crust. Remove and let cool. 

    Notes:

    The first loaves shown are made with my halved recipe, split in half to make two loaves, and uses all purpose and spelt flour mix. The second loaf shown is the same halved recipe making one loaf using whole wheat and spelt flour mix.

    Here's a guide to flours: Types of Flour, How to Buy, How to Store and this one for good measure Guide to Baking Flours 


    I love to toast my bread and top with almond butter and apple slices, pears or figs. When using hummus, I'll add some fresh herbs, spices, cucumber or zucchini slices as well. You could also toast a few slices and add a drizzle of extra virgin olive oil instead of butters. 

    How ever you like it...

    Enjoy!

    FAVORITE SUMMER SANDWICH

    FAVORITE SUMMER SANDWICH

    Nothing like summer time with its abundance of tomatoes, cucumbers & avocados. One of the best ways of putting them together is in a sandwich that I deem my 'favorite'. This is a true classic! It's loaded with flavor and juiciness. I've come back to this sandwich many times over the years. It's simplicity and deliciousness keep me coming back for more... nothing short of wonderful! Enjoy the taste of summer!

    FAVORITE SUMMER SANDWICHFAVORITE SUMMER SANDWICHFAVORITE SUMMER SANDWICH

    FAVORITE SUMMER SANDWICH

    Ingredients
    • 1 large tomato, sliced
    • 1 avocado, sliced
    • 1/2 red onion, thinly sliced
    • 1/2 cucumber, sliced
    • sprouts or leafy greens (both would be great too)
    • hummus, to spread (veganiase would be great too)
    • 4 slices your favorite bread (I used Dave's Killer Bread)
    • mineral salt & cracked pepper, to taste

    Start by toasting, or not, your bread. Add a nice layer of hummus to both inside pieces of bread. Then layer with the tomato, avocado, sprouts/leafy greens. cucumber, red onion and sprinkle with a little bit of mineral salt and fresh cracked pepper.

    Serves 2

    Notes: 

    If you find your hummus very thick, try adding a tablespoon of water at a time and mix well until desired consistency. I prefer my hummus to be on the thinner side for spreads. 


    Back to top