PEANUT BUTTER COOKIES

This glass cookie jar has been on my kitchen counter for the last 20 years. At least 75% of that time, it had peanut butter cookies in it. Our standard comment (“the kids like peanut butter cookies”) was obviously just an excuse, because the kids are all grown (with families of their own) and the jar is STILL full of peanut butter cookies. Needless to say, I don’t even look the recipe up anymore…I think I could make these cookies in my sleep.

PEANUT BUTTER ECLAIR CAKE

The Éclair Cake idea has been around for years. It is a magical dessert that starts with pudding mix and graham crackers, and when it sits in the fridge overnight, something magical happens. The graham cracker layer "softens" and sort of turns into a "cake" layer (people are shocked when they find out its just graham crackers). The whole thing is delicious and I've made it a billion times.  But todays post is a new and simple twist to the Éclair Cake: peanut butter!!

Yes, peanut butter is mixed into the pudding and it takes this simple dessert in a whole different direction. The next time I make this variation, I will use chocolate graham crackers (I only had regular ones this time)....you've gotta give this one a try.  


(2) 3½ ounce instant vanilla pudding
1 cup creamy style peanut butter
8 ounce Cool Whip thawed
3 cups of milk

1 pound of graham crackers

CHOCOLATE FROSTING

6 tablespoons butter (melted)
6 tablespoons boiling water
6 tablespoons baking cocoa
2 cups powdered sugar
1 teaspoon vanilla

Place a single layer of graham crackers in the bottom of a 9x13 dish (breaking to fit if necessary). With an electric mixer, beat the instant pudding, peanut butter with 3 cups milk until very smooth (about 2 minutes) then fold in the Cool Whip. Immediately pour half of this mixture over the 1st layer of graham crackers, spreading it out evenly.

Put another layer of graham crackers on top of the pudding and then another layer of pudding mixture. Top second layer of pudding with a final layer of graham crackers.

Cover the dish tightly, with plastic wrap, and refrigerate for about an hour before you frost it.

After an hour of chilling, whisk together the melted butter, boiling water, cocoa and vanilla until well blended. Add powdered sugar and whisk until smooth. Immediately pour the frosting over the chilled pudding dessert and gently smooth it out.

Place dessert (uncovered) in fridge for an hour or so (until the frosting feels dry to the touch),then stretch plastic wrap over the pan(stretching it tightly so that it doesn't sag and touch the frosting)or just snap a lid onto the dish.
 Refrigerate overnight (important).


NOTE: After this "cake" has been in the fridge, overnight, it is easy to cut into squares to serve because the graham crackers are soft.

PEANUT BUTTER WHIPPED CREAM

I came up with this idea one afternoon and (right out of the chute) it was a keeper.  Whipped cream that has a mellow peanut butter taste... the perfect addition to ANY dessert!!

Make this part a few minutes ahead of time, so it can cool just a little:

1 cup Reece's Peanut Butter Chips
2/3 cup heavy whipping cream

Microwave the above just until the cream gets steamy hot, but not boiling. In my microwave this takes about a minute. Remove from the microwave and whisk until the melted mixture is smooth.

Add
1/4 cup brown sugar
1 teaspoon vanilla extract

Whisk until smooth and set aside to cool a little.

With electric mixer, start whipping 1 1/2 cups heavy whipping cream.
When it gets about "half way" to being whipped cream, slowly drizzle in the peanut butter chip mixture.

Continue whipping until it gets to the consistency you like.


ENJOY !!

GRILLED PEANUT BUTTER & APPLE SANDWICH

GRILLED PEANUT BUTTER & APPLE SANDWICH

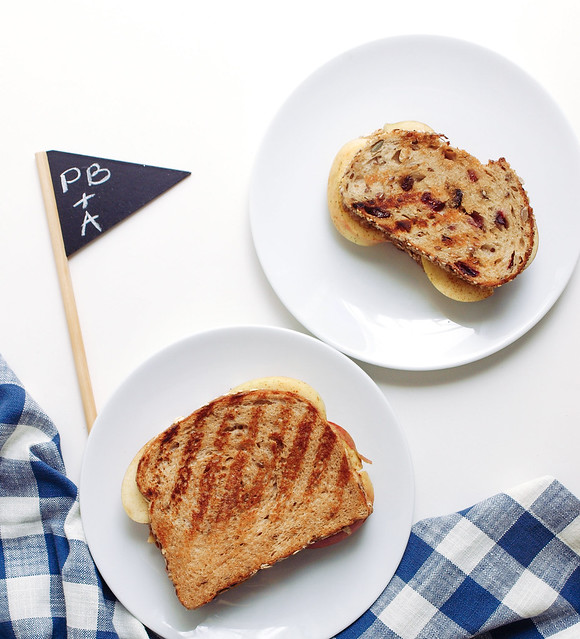
I do love a good sandwich every now and then. And one with sweet crisp apple, warmed nut butter, hints of cinnamon and maple are right up my alley! This sandwich includes plenty of protein, fiber and other good nutritional values to keep us running and happy. I set out to put this into the collection as a nice twist on the old classic PB & J. It could also go as a PB & B if you have some bananas on hand. How great would that be? Very I think! I happen to love versatility when preparing a meal and decided to showcase it here. I've used different breads, mainly because of the various tastes we have in our home. I love the fruit, nut and seed loaf while my daughter prefers a simpler maple oat loaf. Both breads are wonderful giving their own special flavor to the sandwich. I love what the fruit and nut loaf adds to this sandwich and recommend finding one, it really adds a nice touch and pairs perfectly with the ingredients. I used fuji apples as they are our favorites. I think the tart green apples would be great here too. I also varied up the nut butters. I love my almond butter and my daughter loves her peanut butter. So it goes, we have variations and each one of us had our own special version to suit us perfectly... and it was delicious! I encourage you to use your favorite of everything here, this is more of a template than a recipe. You may also consider adding some Coconut Bacon to the middle of this sandwich. Happy creating and eating. Cheers!

GRILLED PEANUT BUTTER & APPLE SANDWICHGRILLED PEANUT BUTTER & APPLE SANDWICH

Spread nut butter on all slices, top with apple slices, dash or two of cinnamon and a drizzle of pure maple syrup...

GRILLED PEANUT BUTTER & APPLE SANDWICH

Cover with top slice and grill until nice and golden on each side...

GRILLED PEANUT BUTTER & APPLE SANDWICHGRILLED PEANUT BUTTER & APPLE SANDWICHGRILLED PEANUT BUTTER & APPLE SANDWICH

Slice in half and enjoy the simples!

GRILLED PEANUT BUTTER & APPLE SANDWICH

GRILLED PEANUT BUTTER & APPLE SANDWICH

Ingredients
  • 2 apples of choice 
  • nut butter of choice
  • cinnamon
  • maple syrup
  • 4 slices bread of choice 
  • coconut oil

Wash your apples and slice in half. Using a teaspoon, scoop out the core. Remove any area from the stem and calyx (bottom indentation) of the apple. Place sliced apple half in standing position and cut into 1/4 inch slices. You should get 3 or 4 slices per half, depending on the size of your apple. Cut the slices in half, vertically.

Add a nice layer of nut butter to both slices of your sandwich, layer one slice with apples, sprinkle with cinnamon and add a light drizzle of maple syrup over top. Place top half on sandwich.

Grease your griddle/skillet with coconut oil and heat over medium. You can also add a very light coating of coconut oil to the top of your bread slice using a silicon brush, or whatever method you prefer. Place sandwich, oil side down, and cook for about 2 - 4 minutes. Brush top half lightly with coconut oil, flip and cook another 2 - 4 minutes. Remove from heat and serve with any remaining fresh apple slices on the side.

Serves two.

Notes:

This would be great with a little Coconut Bacon in the middle.

Make gluten free by using your favorite gluten free bread.

This sandwich can be breakfast, lunch or dinner.

Enjoy the simples!


I'd love to see your masterpeices!
#thesimpleveganista


ALMOND BUTTER COOKIES (4 Ingredients)

ALMOND BUTTER COOKIES (4 Ingredients)

As you can tell from my recipe collection, I'm not much of a baker. Now I know why... If I bake it, I will eat it! I'm usually very content with dipping my dark chocolate in almond butter every night but have been wanting to test out a new nut butter cookie. I'm not a fan of all the typical ingredients that go into many baked goods like butters, tons of sugar and flour. This is why I love my raw cookies and balls so much. They are clean (meaning whole foods), easy and always come out great, unlike baking which is a little tricky sometimes, probably another reason I don't bake very much. So the trick for me is finding baked goods that use minimal ingredients and taste great too. These cookies fit the bill for me! For the person who usually uses butters and such in your recipes this cookie will be a bit different to you but I encourage you to give it at try and see for yourself. It reminds me more of a no bake cookie but with a wonderful baked outside texture. For someone who is already adapted to eating this way....you should have no problem with these!

ALMOND BUTTER COOKIES (4 Ingredients)ALMOND BUTTER COOKIES (4 Ingredients)

The recipe I share with you today is something other than what was intended. It was originally going to be a peanut butter cookie but I ended up using almond butter instead. I also expected it to look like a traditional cookie once done. My first try came out flat, which wasn't a bad thing but they were too soft to pick up without falling apart. Flavor wise they were perfect, although a little too sweet. I tried again using less sugar and baking them a little longer to see if that would help stiffen them up. The result was cookies that reminded me of lace cookies, or something close to that, hence the original title. Once cooled a few minutes, they were sturdy. Perfect! So voila, we have 4 ingredient almond butter cookies. or almond butter thin cookies. And even more so, my baking experience wasn't a total loss. After a few attempts with ingredients and baking times, I finally have a recipe that I can stand behind. They have a nice density and chew, good texture and not too sweet. A little crispy on the edges with a nice chewy middle. And with only four ingredients, well technically five if using the flax egg, this is such an easy recipe to make. And they pair perfect with a nice glass chilled glass of non-diary milk or lemon water. I have been thoroughly enjoying all this cookie testing! I hope you will enjoy this cookie...not too soft, not too crisp...just perfectly in the middle. And, for what they are with only 4 ingredients...I'm completely satisfied with the outcome. If you appreciate a clean cookie, you may really enjoy these too! 

Just a note: I tried making these with peanut butter hoping it would be the same results but didn't care as much for the outcome with this recipe. It was a more traditional looking cookie that was soft and tender with a velvety texture. Maybe that is something you might like to try! I hope to have a peanut butter cookie recipe soon as I know not everyone has almond butter available and I want a go-to peanut butter cookie recipe! 

ALMOND BUTTER COOKIES (4 Ingredients) 

Gather your few ingredients...

ALMOND BUTTER COOKIES (4 Ingredients)ALMOND BUTTER COOKIES (4 Ingredients) 

Mix dough well, place rounded scoops on baking sheet, flatten and bake...

ALMOND BUTTER COOKIES (4 Ingredients)

Remove from oven and let cool. Enjoy these incredibly simple and flavorful cookies!

ALMOND BUTTER COOKIES (4 Ingredients)

ALMOND BUTTER COOKIES

Ingredients
  • 1 cup almond butter (room temperature)
  • 1/2 cup coconut sugar or organic pure cane sugar
  • 1 tablespoon vanilla extract
  • 1 flax egg (1 heaping Tbsp flaxseed meal + 3 Tbsp non-dairy milk or water) or 1/3 banana, mashed
  • 3 level tablespoons oat flour or flour of choice, optional (see notes)

Preheat oven to 350 degrees.

Start by making your flax egg. In a small bowl, place flaxseed meal and water/milk, stir and set aside to set, about 15 minutes ideally. Or if using banana, mash well in a small bowl and set aside.

In a medium mixing bowl, combine nut butter, sugar, vanilla and flax egg/banana. Mix well until dough is stiffened and hard to mix, about 1 minute. Line baking sheet with a silpat, parchment paper or lightly grease with oil. Using a tablespoon measure, scoop out rounded scoops, place on cookie sheet about 2 inches apart. Using a fork or your index and middle finger, gently press to flatten, making a crisscross pattern. Your dough will seem oily and stick to the fork, it's normal with the almond butter, just be patient..you'll be rewarded soon. Feel free to sprinkle a little sugar or salt over each cookie. Place baking sheet on middle rack and bake 12 - 15 minutes. (edit: I tried different baking sheets with different results. Cooking time will vary from sheet to sheet. The sheet shown was baked for 15 minutes, other sheets require lower cooking times or the edges will brown more than you may like.) Remove from oven and let cool.

These are best stored covered on a couple paper towels, the paper towels will help soak up some of the natural oils.

Makes approx. 14 cookies (that's if you don't eat the batter!).

Notes:

For this recipe I used Trader Joe's Raw Almond Butter, Creamy and Crunchy, both worked well. Keep in mind that other brands of almond butter may contain added sugars...adjust the sugar slightly by reducing a tablespoon or so if you like. Also, keep in mind that your cookies may vary in shape depending on what type/brand of almond butter you use.

Try subbing in 1/3 of a banana for the flax egg. I did a few trials with this method and had great success!

As noted above, I tried making these with natural peanut butter hoping it would be the same results but didn't care as much for the outcome with this recipe. Of course, you can try if you like and find you like it. They were soft, tender with a velvety texture.

If you want a more traditional cookie (like the ones below), add 3 level tablespoons flour (oat, spelt, whole wheat pastry or all purpose gluten free) to the mix and bake for 12 - 13 minutes. The addition of the flour will help soak up some of the natural oils making these a crisper cookie with a nice chew. I used chunky almond butter for the cookies below. Again delicious! (If you want a traditional looking cookie without the flour, try using refrigerated almond butter and mix the batter once the oven is ready. I didn't test this out yet with the almond butter but I have a feeling it will work great!)

ALMOND BUTTER COOKIES (4 Ingredients)

However you like your cookies...enjoy the deliciousness!


I'd love to see your masterpieces!
 #thesimpleveganista


Summer Rolls + Two Dipping Sauces

Summer Rolls + Two Dipping Sauces

Well hello again, I have missed you terribly! A lot has happened in the last couple weeks. After my last post Soba Noodles with Tofu, Broccoli & Carrots, I left for vacation to the beautiful Kings Canyon. The area we visited is located in the eastern sierra's located between Mammoth and Bishop just off the 395 called Rock Creek Lake. It's gorgeous up there with clean air, nice temperatures and nature all around. How does it get any better than that? You can see many of my pictures here. In that time, the 4th of July also came and went. I extreme cleaned the house, you know the unclutter, going behind closed doors and rearranging the furniture kind...feels good to be done with that! I did all those things I have put off doing while focusing my energy on this blog the last year. Speaking of which, The Simple Veganista also turned 1 on July 1st. I can't believe it's been a year already. I really wanted to do a special post for this occasion but it just didn't happen so it was a quiet celebration. When I first started this blog I had no idea where things would go but thanks to everyone who has a love for clean vegan food...this blog has done remarkably well in that short amount of time and I thank you all for following along with my passion. I intend to keep it going as long as it stays fun for me. I love all the aspects of being here...from testing and preparing the food, taking pictures, editing, writing (a few of these I'd like to improve on), sharing, getting feedback from everyone. It's truly fun for me and I'm so happy to be a part of your lives and hope you get lots of inspiration for clean, healthy eating habits along the way. And remember, that's all it is...creating NEW habits and making them healthy habits! Cheers to another year of creating those healthy habits that stick... 

So without further ado...let's eat!

Summer Rolls + Two Dipping Sauces

Summer, spring or salad rolls, known as Goi Cuon in Vietnamese, are fresh, versatile and so easy to put together. You can use all kinds of vegetables to suit your taste...make them simple with just a few ingredients like the first picture or add more for a variation and rainbow effect like the picture above. I love these rolls and you can be sure that this is the first of many I will like to try out and share. The recipe today is a very basic, all around summer roll. Nothing complicated, everything should be readily available and easy to find. For a great tutorial on rolling a closed end roll like the image just above (they were cut in half) go here: How to Roll Fresh Vietnamese Spring Rolls – A Photo Tutorial

Summer Rolls + Two Dipping SaucesSummer Rolls + Two Dipping Sauces

You can find rice paper in the Asian section of your grocery store. There are different shapes and sizes so if you're new to this be sure to experiment with a few to see what works best for you. 

I have included two different dipping sauces because some of you may be allergic to nuts. One will be a peanut or almond butter based dipping sauce and the other will be rice vinegar based. A sauce for everyone here. Both are excellent. I love my peanut sauce but was very pleased with the vinegar based sauce I adapted from Martha Stewart. Even though I'm not much of a vinegar lover...it was delicious! 

Summer Rolls + Two Dipping Sauces

Summer rolls are commonly filled with a few herbs like mint, cilantro and/or Thai basil. Feel free to use one or a combination. I find in these rolls that they all taste great together. If you can't find Thai basil, regular basil will be just as good! I especially love the basil with the peanut dipping sauce...the flavors pair so well.

Summer Rolls + Two Dipping Sauces

Next you can choose from a variety of greens to add to your rolls. Use one or a combination if you like. Depending on what style roll I'm making, I may use two types of greens.

Summer Rolls + Two Dipping Sauces

Lastly, choose your veggies and cut them into thin strips by hand or using a julienne tool. These are just a few of the veggies you can use. Try adding avocado, green onions, bean sprouts, etc. Many recipes for these rolls also use rice noodles, and you can too, but I prefer a roll full of veggies instead having one or two extra if needed. I can eat two or three of these and be completely satisfied for a few hours. 

Adding in some sliced tofu is an option. I do like to add it to my rolls when not using the peanut sauce as it adds some protein to the meal. 

Summer Rolls + Two Dipping Sauces

Summer Rolls + Two Dipping Sauces 

Ingredients (2 - 3 servings)
  • 6 rice papers (preferably the circular sheets)
  • 2-3 medium carrots, cut into match sticks or 1/4 inch sticks
  • 1/2 cucumber, cut into match sticks or 1/4 inch sticks
  • 1/2 bell pepper (yellow, red and/or orange), thinly sliced
  • 1/4 red cabbage, thinly sliced
  • greens of choice: leafy lettuce, pea shoots, spring salad mix or micro greens
  • radishes, thinly sliced (optional)
  • organic tofu (firm or extra firm), sliced (optional)
  • mint, small handful of leaves
  • cilantro, small bunch of sprigs
  • basil, small handful leaves

Sweet Chili Sauce (2 servings)
  • 1/4 cup unseasoned rice vinegar
  • 2 tablespoons tamari or soy sauce
  • 2 tablespoons warm water
  • 2 tablespoon maple syrup
  • 1 clove garlic, minced or grated
  • 1 teaspoon red pepper flakes, or to taste
  • juice of 1 lime

Peanut Sauce (2 servings)
  • 3 heaping tablespoons peanut or almond butter
  • 1 tablespoon tamari or soy sauce
  • 2 tablespoon maple syrup
  • 2 tablespoon warm water
  • 1 - 2 tablespoon rice vinegar, optional
  • juice of 1 lime
  • 1 teaspoon red pepper flakes, optional

Mix your dipping sauce together first, let set so the flavors can mingle. It will taste much different after a few minutes. Taste for flavor before serving.

This summer roll direction will be for the open end roll as shown above. For the closed end roll please see the tutorial here. 

Fill a large shallow bowl 1/2 way with warm water...a large pie dish works great for the circular rice sheets which is what this recipe will use. Making one roll at a time, dip the rice sheet into the water making sure to get both sides and all edges, no need to let it soak until completely soft. Lay on a flat surface and fold in half, the rounded side will be the top and the flat side the bottom. The paper will still seem a bit stiff but will keep absorbing the water and soften as you layer your veggies. In the center, layer your ingredients...greens, herbs, tofu and veggies. Fold the end corner over the layer of veggies, give a nice tuck and roll. 

Serve with choice of dipping sauce. 

Enjoy!


    MINI PEANUT BUTTER CHEESECAKES

    Chocolate glazed, mini peanut butter cheesecakes, what could be better? My family loves cheesecake and I've made a bagillion of them over the years, but I've never quite mastered cutting them cleanly, especially when serving a crowd. These mini cheesecakes are the perfect solution for Easter this year.

    CRUST
    1½ cups graham cracker crumbs
    4 tablespoons sugar
    ¼ cup melted butter
    pinch of cinnamon

    Mix crust ingredients well, set aside

    FILLING
    (2) 8 ounce pkg. cream cheese room temperature
    1 cup granulated sugar
    1 teaspoon vanilla extract
    1/2 cup creamy style peanut butter
    3 tablespoons flour
    2 eggs

    Line cupcake pan with paper liners (this recipe makes 18 cheesecakes). Spoon a little of the crust crumbs into each paper liner and press down. Set aside and preheat your oven to 350°F

    In a large bowl, beat the room temperature cream cheese and granulated sugar until very smooth, scraping down the sides of the bowl if necessary. Add the peanut butter and vanilla and beat until smooth.

    While beating, sprinkle in the flour and then add the eggs, one at a time, mixing until smooth.

    Fill the paper liners almost full (I use an ice cream scoop for this).  Bake in 350°F oven for 20-23 minutes. My electric oven took 23 minutes.

    Cool to room temperature, then top with chocolate glaze.

    CHOCOLATE GLAZE
    6 tablespoons melted butter
    6 tablespoons unsweetened baking cocoa
    6 tablespoons boiling water
    2 cups powdered sugar
    1 teaspoon vanilla extract

    Mix the cocoa into the butter until smooth. Add the boiling water and mix well. Add the powdered sugar and vanilla and whisk till smooth.  Pour over the cooled cheesecakes and put in the fridge to help the glaze "set".

    Store cheesecakes, covered, in the refrigerator until time to serve.

    PEANUT BUTTER SNACK CAKE

    Are you old enough to remember the snack cake craze? Simple sweet cakes made for no special occasion, other than to just "snack on"; they were great. I don't  know when, or why, they faded from the scene, but I've decided to bring them back into my kitchen as a welcome change from the ever present cookie jar. Peanut butter cake, studded with mini-chocolate chips and frosted with a peanut butter and honey frosting...what's not to love?!
    This cake is delicious and, if kept covered, stays moist for several days. The recipe ingredients listed here are for a 10" round cake, but you can double the ingredients and bake it in a 9"x13" pan as well.

    1 cup all purpose flour
    1 cup brown sugar (packed)
    1/2 cup peanut butter
    1/4 cup butter (room temperature)
    1 teaspoon baking powder
    1/2 teaspoon baking soda
    1/2 cup milk
    1 teaspoon vanilla
    2 eggs
    1/2 cup semi-sweet mini-chocolate chips

    In the bowl of an electric mixer, beat the flour, sugar, peanut butter and butter until it is crumbly.

    Add the rest of the ingredients (except the chocolate chips) and mix on low speed until everything is well combined, then mix on med-high speed for three minutes.

    Dust the mini-chocolate chips with a tablespoon of flour and then shake off the excess (this will keep them from sinking in the batter as they bake). Stir chips into the batter.

    Bake in a greased and floured 10" round pan at 350° fir 35-40 minutes or until toothpick tests clean (my electric oven took 35 minutes).

    Cool in the pan for 10 minutes then turn out onto serving plate.
    FROST THIS CAKE WHILE STILL HOT!!

    PEANUT BUTTER AND HONEY FROSTING
    1/2 cup peanut butter
    2 tablespoons honey
    1 teaspoon vanilla extract
    2 cups powdered sugar
    4 to 5 tablespoons milk
    Warm the peanut butter and honey in the microwave until it is soft but not melted. Add the rest of the ingredients and beat with electric mixer until smooth and creamy.  FROST CAKE WHILE STILL HOT.

    NOTE:  If you double this recipe for a 9"x13" cake, 
    make sure you double the frosting as well.


    PEANUT BUTTER CREAM BARS

    I've been making these bars since my kids were little; now I make them for my grandchildren. I think that is the mark of a great recipe, don't you? 

    This cookie bar has a creamy (peanut butter and sweetened condensed milk) layer between two chewy oatmeal cookie layers. As if that wasn't enough, the finished bars are drizzled with a peanut butter frosting glaze. They are SO GOOD and they make a great bake sale item.

     
     2 cups raw quick oats
    1¾ cups brown sugar
    1½ cups all purpose flour
    1 teaspoon baking powder
    ½ teaspoon baking soda
    1 cup butter
    2 cups chocolate chips (or 1 cup mini chocolate chips)
    1 beaten egg
    14 ounce can sweetened condensed milk (not evaporated)
    1/3 cup creamy peanut butter

    Combine the first 5 ingredients in a large bowl and then cut in the butter (like you would for a pie crust). I do this step with an electric mixer, but don't do it with a food processor because it will chop the oatmeal to finely.

    Remove 1¾ cups of these crumbs and put them in a small bowl with the chocolate chips and set it aside.

    Mix the beaten egg into the remaining crumb mixture (not the part with the chocolate chips) and mix well. Press this mixture into a greased (I use parchment paper instead of grease) 10" x 15" x 2" baking pan and bake in preheated  350 oven for 15 minutes.

    While the base is in the oven, whisk the sweetened condensed milk together with the creamy peanut butter and set aside.

    When the partially baked crust comes out of the oven, drizzle the milk-peanut butter mixture evenly over the crust. Sprinkle evenly with the reserved crumb-chocolate chip mixture and bake, at 350, for another 15 minutes.

    Drizzle the baked bars with peanut butter frosting while they are still warm. Cool completely in the pan before cutting into squares.


    NOTE: For ease of cutting, I line the pan with parchment paper and leave the sides a little long, so I can grab the COOLED bars and lift them out of the pan for slicing.

    PEANUT BUTTER GLAZE
    1/2 cup creamy peanut butter
    2 tablespoons butter soft
    1 teaspoon vanilla extract
    2 cups powdered sugar
    4 tablespoons milk

    Now keep in mind, I NEVER, and I mean NEVER measure ingredients for a cake glaze, so I'm hoping these amounts work for you.  Heat the peanut butter and butter in the microwave until it is nice and soft.  Add the vanilla, milk and sugar and whisk till smooth.  If it seems a little dry, just add another tablespoon or so of milk. If it seems too soupy, add a tablespoon or so more powdered sugar.  When the glaze is nice and smooth, drizzle it over the warm bars.


    PEANUT BUTTER BROWNIES with CHOCOLATE-PEANUT BUTTER FROSTING

    We are huge fans of peanut butter and chocolate together, are you? This peanut butter brownie has peanut butter and miniature chocolate chips in the batter and a peanut butter - chocolate frosting on top...oh my, it was good!!!


    1½ cups all purpose flour
    1 teaspoon baking powder
    ¼ teaspoon salt
    6 tablespoons butter, room temperature
    ½ cup smooth peanut butter
    2/3 cup granulated sugar
    2/3 cup brown sugar
    3 eggs
    1 teaspoon vanilla extract
    1 cup miniature semi-sweet chocolate chips

    Preheat oven to 350 and spray a 8" x 11" baking dish with vegetable spray.

    After you measure the flour, remove a tablespoon of it and toss it with the miniature chocolate chips...set aside (this will keep the chocolate chips from sinking in the batter as they bake).

    Cream the peanut butter and room temperature butter until smooth.  Add the sugars, vanilla and eggs and beat until smooth with electric mixer.

    Add the flour, baking powder and salt and beat on low until combined (don't over-beat). Stir in the flour coated miniature chocolate chips.

    Spread in the prepared baking dish and bake 35-40 minutes. NOTE: At 35 minutes, my brownies looked a little dark, so I just shut the oven off and let them sit in there for another few minutes. Use toothpick to test for done-ness.

    Remove from oven and place pan on a cooling rack for 20 minutes or so before frosting. 


    If you let these frosted brownies cool completely, they will cut cleanly like this.  

    I frosted these with my chocolate - peanut butter frosting...posted HERE

    PEANUT BUTTER CHOCOLATE CHIP COOKIES

    Picky picky husband loves anything peanut butter and I love anything chocolate; so I combined two of our favorite recipes and this cookie "was born".  It is a GREAT lunch box or picnic cookie, as they travel well and stay soft if you keep them in a lidded cookie jar.
    1/2 cup butter flavored Crisco  (see note below)
    1/2 cup creamy peanut butter (I use Jiff)
    2 eggs
    1 teaspoon vanilla extract
    1/2 teaspoon salt
    1 teaspoon baking soda
    1/2 cup brown sugar
    1/2 cup granulated sugar
    2 ¼ cups all purpose flour
    1/2 cup miniature chocolate chips
    1 cup chopped pecans

    Cream the butter flavored Crisco, peanut butter, eggs and vanilla until smooth and creamy. Add the sugars and mix well.

    Add the flour, salt and baking soda and mix well. Stir in the miniature chocolate chips and pecans.

    Roll into balls about the size of a walnut and bake on parchment paper lined baking sheet for 10-12 minutes (at 375 degrees) until they are very light golden around the edges.

    They won't look quite "done" in the center, but trust me...they are.

    NOTE: Some people freak out about using Crisco in cookies, however, 99.9% of the reports show that there is virtually zero difference between Crisco and butter when it comes to saturated fat, not to mention there is zero cholesterol in Crisco (something you can not say about butter).  Just make sure (for flavor sake) you use butter flavored Crisco.

    I have no idea how these cookies turn out if you use all butter... I just know that in classic chocolate chip cookies, you get a super thin misshapen cookie if you use butter... but if you use butter flavored Crisco in that same recipe, you get a nice thick, perfectly round cookie.

    NOTE: I like to use miniature chocolate chips in my cookies because they distribute in the batter well, however, regular size chocolate chips would work too.

    PEANUT BUTTER PUDDING

    Last week I got a weird idea for peanut butter pudding; the process was a lot more complicated than I thought it was going to be. I tried several Internet recipes and none of them were exactly what I was looking for. Picky-picky husband was my Guinea pig taste tester and the first spoon full of each new recipe elicited those serious "brow furrows" that make all cooks cringe.

    I didn't let that slow me down in my quest for a great "kid pudding". My next move was to start combining and tweaking recipes... the richness from this one ...the consistency from that one ... the sweet-factor from another one. The final result brought a "pudding face smile" to old Picky-picky AND the grand kids. This one IS a keeper!!!

    I layered this recipe with sliced bananas and Hershey chocolate syrup, but next time I think I'll try layering it with crushed chocolate wafers ... Yummm!!!


    This pudding is rich, creamy, peanut butter-y and oh so easy to make!!

    2/3 cup dark brown sugar (light brown is OK, but dark brown is better)
    2 level tablespoons of corn starch
    1/8 teaspoon salt
    1¾ cups whole milk (I've used 2% in a pinch)
    1/2 cup heavy whipping cream
    1/2 cup creamy peanut butter
    1 teaspoon vanilla extract

    In a saucepan that has a heavy bottom, whisk together the brown sugar, corn starch and salt. This step helps the cornstarch from clumping-lumping when you add the liquid.

    After the sugar, cornstarch and salt are whisked together, slowly add the milk and cream. Stir to make sure everything is mixed well.

    Bring to a boil, over medium high heat, stirring constantly. When this mixture gets nice and thick, add the peanut butter and whisk until it is totally melted and pudding just starts to boil again, (takes about 30 more seconds). Remove from heat and add vanilla extract, mix well.


    Pour into a pretty serving dish (or individual dishes) and lay plastic wrap directly on top of the hot pudding (make sure the plastic is actually touching the pudding) so a "skin" doesn't form on the pudding as it cools.  Chill for 2-3 hours or overnight.
    What a great recipe for ANY kids birthday party!!

    PEANUT BUTTER KRISPIE TREATS

    This recipe has been around forever; it is one of those classic sweet treats from our childhood.  Picky-picky husband is a big fan of the old fashioned Rice Krispie treats made with melted marshmallows, so he initially resisted this peanut butter version (he resists change).  However, this evening, I noticed that the pan of treats, on the kitchen counter, had been seriously noshed upon.

    This recipe is SUPER easy and uses all pantry ingredients, which is a good thing.  It goes together in just minutes (the longest part of this recipe is the cool down time). They cut beautifully if you let them cool all the way down and they travel well.

    1 cup light Karo syrup
    1 cup granulated sugar
    1 cup peanut butter
    6 cups Rice Krispie cereal
    1 cup semi-sweet chocolate chips
    1 cup peanut butter chips (see note)

    Mix the syrup and granulated sugar in a heavy saucepan, over medium heat (stirring). Bring to a boil and immediately remove from heat; stir in peanut butter until smooth and well mixed.

    Pour over Rice Krispie cereal and stir to coat evenly.  Press into a lightly greased 11" x 7" pan (see note) and press down evenly with slightly damp hands.

    Melt the chocolate chips and stir until smooth (I melted mine in my microwave at 60% power for about 1½ minutes).  Spread evenly over bars.  Cool about an hour before cutting.

    NOTE: This recipe calls for half semi-sweet chocolate chips and half peanut butter chips, but any combo would work well.  I found a similar recipe that used half semi-sweet chocolate chips and half butterscotch chips for the frosting (they called them Scotcheroo's).
    NOTE: The size of the pan is not really important. Just remember that the smaller the pan is, the thicker the treats will be and the bigger the pan is the thinner they will be.

    MAPLE PEANUT BUTTER FUDGE (MICROWAVE)

    I found this recipe on one of my favorite recipe pages: The Domestic Mama and; The Village Cook. I have found some great recipes over there, and I highly recommend their recipe blog.

    This quick and easy microwave fudge is totally addicting. I made it the other day and our company went nuts for it (I have to admit that Picky-Picky Hubby and I ate our share as well). The unlikely maple-peanut butter combo is fantastic; not quite peanut butter, not quite maple, hint of butterscotch maybe?


    8 ounces salted butter
    1 cup creamy peanut butter
    1 pound of powdered sugar
    1/4 teaspoon salt
    1 1/2 teaspoons maple extract
    1 teaspoon vanilla extract

    Line an 8" x 8" buttered pan with parchment paper so that the parchment overhangs enough to fold over, once the pan is filled (I didn't butter the pan).

    Place the butter and peanut butter in a large (microwave safe) bowl; cover with plastic wrap. Microwave on high for 2 minutes (cut the butter into cubes and mix it into the peanut butter so that it all melts evenly).

    Remove the bowl from the microwave (carefully, it is hot), and stir. Re-cover and microwave for (an additional) 2 minutes. Remove from microwave (careful, it is really hot) (watch for hot steam when you remove plastic).

    Add the extracts and powdered sugar and stir with wooden spoon (I used my stand mixer). Press into prepared pan and press down until flat and compact. Cover the top of the fudge with extra parchment paper. Place in fridge for 2 to 4 hours.  Bring to room temperature before you try to slice this fudge. I didn't butter the pan, so I had to run a thin knife around the edges before I lifted the fudge out of the pan by using the parchment paper "handles".

    Store in air tight container at room temperature. I didn't put mine in an air tight container, I just left it in a bowl with loose fitting lid.

    NOTE: If the fudge seems "crumbly" while it is still hot, don't worry about it. Just press it tightly into the prepared pan and when it chills, it will look just like the photo. Eight ounces of butter seems like a lot, but I can guarantee you the fudge does NOT taste greasy at all, it is excellent.

    PEANUT BUTTER CLOUD PIE

    If you like peanut butter, this pie is a little taste of heaven on earth. It is super easy to make (even easier if you use a ready made Oreo crust). It is the perfect ending to any meal; it is not heavy at all and it is absolutely delicious frozen.


    CHOCOLATE GRAHAM CRUST
    1¼ cups chocolate graham cracker crumbs
    ¼ cup granulated sugar
    ¼ cup melted butter
    .
    Mix ingredients and press into a 9" pie plate. Bake at 375 for 10 minutes then cool completely before filling.
    .
    FILLING
    8 ounces cream cheese (room temperature)
    1 cup creamy peanut butter
    1 cup powdered sugar
    1 teaspoon vanilla extract
    1½ cups heavy whipping cream
    .
    Beat the cream cheese and powdered sugar until well mixed; add the peanut butter and vanilla and beat on high until very well mixed and light in color.
    .
    In a large bowl, beat the whipping cream until stiff peaks form. Gently spoon the peanut butter mixture into the whipped cream and gently fold the two together until well combined.
    .
    Pour into baked and cooled pie shell. Chill for several hours or speed chill in the freezer for about 3 hours.

    NOTE: Make sure your cream cheese is at room temperature for this recipe. If you don't have room temperature cream cheese, you can put it in the microwave for 10-13 seconds (take the wrapper off first).

    NOTE: Everyone I have ever served this to has raved about it. I hope you give it a try. I think next time I make it for a potluck, I'm going to double (or triple) the recipe and make it in a big sheet pie.
    .

    NOTE: I like to serve this after it has been in the freezer for 3 hours. If you leave it in the freezer overnight, take it out about 15 minutes before serving.
    Back to top