NO-BAKE CANDY CAKE


I found this idea on a web site a few years ago (long before I was aware of the blogging world). It is a fun (and easy) project which can be tailored to any age, holiday or special occasion.

Need a gift for someone at work or school? Make them a small version. Make a huge version for a table centerpiece at a teenager’s birthday party. The possibilities are endless.

The “candy cake” pictured was made with a 9” cardboard circle for a base. Since the candy you are going to fill this with is heavy, the base cardboard needs to be pretty rigid, so…if in doubt, double-up your cardboard. If you double up your cardboard, wrap it in foil to disguise it.

Next, I hot glued two (FLAT) 8” Styrofoam wreath circles (craft dept. at Walmart) on top of each other, then wrapped them with wide ribbon (to disguise them) and glued them to the cardboard circle base. Now you should have a flat base with a ribbon wrapped “lip” around the outer edge of the base.

Next, attach mini-candy bars or mini-boxes of candy to the outside of the “lip” by placing a SINGLE SMALL DOT of hot glue on the back of the candy wrapper (use my photo as a guide).


Now fill the hollow area inside of the Styrofoam wreath "lip" with loose, wrapped candies, fill to the top.Next, think about decorating the flat top of the Styrofoam “lip”. You can either glue more candy to it, or push lollipops, blow pops, or any candy on a stick, into the Styrofoam so it will add height (see my photo).

TIP: Plan ahead and make sure all of your candy bars are facing in the same direction. Keep your design or color theme in mind when you are choosing candy bars.


TIP: If you are using hot glue on chocolate bars, remember just one little dot will suffice and if you are concerned about it, freeze them first.

TIP: Do not use any unwrapped candy.
TIP: If giving as a gift, this looks especially festive if you wrap it in clear cellophane and decorate it with lots of curly ribbons.

The hardest part of this project is not snacking on the candy while you are constructing it!!!

PINEAPPLE UPSIDE-DOWN CUPCAKES

These little pineapple upside-down cupcakes are super rich-gooey-yummy. They are easy enough for every-day eating and pretty enough for ANY holiday table. They are SO tasty (and portable) that they disappear very quickly. Recipe makes two dozen.

CARAMEL PEAR UPSIDE DOWN CAKE FOR VALENTINES DAY

I hope you will consider making this caramel pear upside down cake for your Valentine sweetheart. Served warm with a big scoop of vanilla ice cream, it will knock his/her socks off. Fresh Bosc pears, are baked in a homemade caramel sauce while a ginger-cinnamon cake bakes on top. This recipe has a couple of extra steps (to make the caramel sauce) but it is not hard to do. It is the most moist cake I've ever made.


Preheat your oven to 350F and spray a 9" x 2" cake pan with vegetable spray. Line the bottom of the pan with parchment paper and then spray it again.

ANGEL FOOD CAKE

Have you ever tried an angel food cake made from scratch? They are a little intimidating, at first, but the flavor and texture is extraordinary and you will never be happy with a bakery angel food cake again. They are worth every bit of effort!! It is amazing how tall this cake gets!


Read these instructions at least twice before you start baking…then follow the instructions to a "T". This is one cake you shouldn’t experiment with.

1 cup of cake flour
1 ½ cups white sugar (divided)
12 egg whites
1 teaspoon vanilla extract
½ teaspoon almond extract
1 ½ teaspoon cream of tartar
½ teaspoon salt


Preheat oven to 375°. Be sure that your 10” (two piece) angel food pan is TOTALLY FREE of any grease or oil and it needs to be an angel food pan that is NOT Teflon coated. Make sure your mixing bowl, beaters and mixing spoons are all totally grease free. Remember, grease is the enemy when making an angel food cake because the cake is mostly egg whites. The cake needs to “grab onto” the sides of the pan in order for it to raise, and if there is grease (or Teflon), it can’t do that.
Do ahead: Sift 1 cup of CAKE flour with ¾ cup of white sugar and set aside.
In a large bowl, whip the egg whites, vanilla, cream of tartar and salt with an electric mixer, on high, until you get medium peaks (it takes about five minutes). Continue to whip and SLOWLY add ¾ cup of the sugar into the whites. Continue beating until the whites get to the stiff peak stage.

Next FOLD the flour/sugar combo into the whipped egg whites a tablespoon at a time. Make sure you FOLD, this mixture into the egg whites, DO NOT use mixer to do this and DO NOT stir. Gently fold from top to bottom. This process is necessary so you do not deflate the egg whites.

Put the batter into the angel food pan and smooth the top a little. Bake for 45 minutes. When the cake is done, the top will spring back just a little when you lightly touch it and the cake top will be dry to the touch. Remove from oven and immediately invert the pan and cool for a couple of hours. To remove the cooled cake from the pan, use a long slender bladed knife (I like my bread knife) and run it around the sides of the pan in small sawing motions. Next do the same around the center tube of the pan. Lift the cake out and run your knife under the cake, it should then life right off of the pan.
NOTE: Separate your egg whites into a small bowl before you add them to your mixing bowl so you don’t get ANY yolks into the batter.
NOTE: Save the yolks in a clean jar in the fridge. They will be good for a couple days at least.
NOTE: I usually run my utensils through the hottest dishwasher setting before I make this recipe, to insure they are totally grease free.


I hope I haven’t scared you away from trying this cake. It is delicious and worth every bit of effort.

MAPLE-WALNUT MINI MUFFINS

The combination of maple and walnut just seem to go together in this sweet, moist mini-muffin. They are perfect with a hot cup of tea or if you are on the go. The muffins have a sweet maple syrup glaze on the top.
1 cup light brown sugar
½ cup flour
2 eggs
2/3 cup soft butter
½ teaspoon vanilla
½ teaspoon maple extract
1 cup chopped walnuts

SARAH LEE POUND CAKE CLONE

I don't know how many times I've tried one of those clone recipes and later thought..."close, but no cigar".  But this time, I've hit the mother lode.

Not only is this cake made from standard pantry staples, but it is rich, buttery and it has a very fine and velvety crumb, just like a Sarah Lee pound cake. I can think of a million great uses for this quick and easy cake, but I doubt it will last that long around here. I'm definitely going to be putting one of these beauties in the freezer for unexpected guests.


8 ounces butter at room temperature (no substitutions)
2 cups powdered sugar
2 large eggs
3 tablespoons sour cream
1 2/3 cups CAKE FLOUR  (important, no substitutes)
2 teaspoons lemon extract
1 teaspoon vanilla extract

Recipe calls for an 8 1/2" loaf pan. If you are using Pyrex, preheat your oven to 325°. If you are using a metal pan, preheat the oven to 350°. Spray the pan with cooking spray, then line it with parchment paper (or foil) and spray again.

Cream the butter and powdered sugar with an electric mixer on high speed for a full FIVE MINUTES.

Add one of the eggs and a couple spoons of the flour and beat another TWO MINUTES.

Add the 2nd egg and half of the remaining flour  and beat another TWO MINUTES.

Add the sour cream and the rest of the flour and the extracts, and beat another TWO MINUTES.

Spread the batter into the greased parchment paper lined loaf pan and bake  65 minutes or until a toothpick tests clean.

Cool in the pan (on a rack) for 20 minutes before you take it out of the pan.  Wrap the HOT pound cake snugly in plastic wrap and cool completely.
 

NOTES: It is important to use cake flour. With all of the mixing in this recipe, all purpose flour or bread flour wouldn't give you a very good cake.

EASY MOIST POUND CAKE

This cake is not only easy to make, but it is super moist and flavorful. It is great just to snack on, or for shortcake or even petit fours. When its cooled, it cuts beautifully.

 
3/4 cup butter (room temperature)
6 ounces cream cheese (room temperature)
5 eggs (room temperature)
1 1/2  cups sugar
1 teaspoon baking powder
2 teaspoons vanilla extract
1 teaspoon coconut extract (see note)
3 tablespoons milk
1 3/4 cups + 2 tablespoons all purpose flour
 
Spray a 9" x 5" x 2 3/4" loaf pan with cooking spray and then line the bottom only with parchment paper (waxed paper will work in a pinch) then spray the paper too..
 
In large bowl, beat the butter, cream cheese, sugar, baking powder, milk and extracts until smooth.
 
Add the eggs, one at a time, beating well after each egg. When the eggs are all in there, beat batter on high for 3 minutes.
 
Sift the flour, then add it (while the mixer is running on LOW) 1/4 cup at a time, beating only until the flour is well incorporated, but don't over mix.
 
Bake in prepared pan in pre-heated 350° oven for 70 to 75 minutes or until a toothpick tests clean. My electric oven takes 70 minutes.
 
Let the cake cool in the pan for 15 minutes, then run a knife around the edges and tip it out onto a cooling rack.
 
While the cake is still VERY hot, wrap it tightly with plastic wrap and let it cool that way. This makes a huge difference in the moisture any cake will have. I do ALL of my cakes this way.
 
 
NOTE: The coconut extract gives this cake a wonderful flavor (you won't taste the coconut) but it really adds to the vanilla flavor. If you don't have coconut extract, use the required 2 teaspoons of vanilla and 1 more teaspoon of your favorite extract, like rum, or orange or almond.
 

FRESH PINEAPPLE UPSIDE-DOWN CAKE

I'm not sure WHY I've never thought of making a pineapple upside-down cake with FRESH pineapple before. Maybe it is because ALL of my cookbooks suggest canned pineapple? Maybe it is because canned pineapple is always in the pantry? Maybe it is because I'm not very adventurous? Well, this cake came about due to the rare combination of... "I want to bake something" + "what can I do with this very ripe pineapple?" + "the perfect window of time". 

The end result was this pineapple upside-down cake made with FRESH pineapple and it was delicious!! The difference is like night and day!!


Preheat your oven to 350 and cut a parchment paper liner for the bottom of a 9" round cake pan. Spray the pan and parchment paper with a light coating of cooking spray. The parchment paper is not absolutely necessary, but it helps if you have a "sticking" issue with the sweet pineapple glaze (you can use waxed paper in a pinch).

5 tablespoons of melted butter
2/3 cup brown sugar (packed)
3 cups fresh pineapple cut into 1" cubes (see note)
maraschino cherries cut in half
1 1/2 cups all purpose flour
1 1/2 teaspoons baking powder
1/2 teaspoon salt
1/2 teaspoon cinnamon
1/2 cup butter (room temperature)
2/3 cup white sugar
2 eggs
3/4 cup pineapple juice (or milk)
1 teaspoon vanilla
1 teaspoon butter extract
1/2 cup pecans chopped medium-small

Mix melted butter with brown sugar and spread evenly in prepared 9" round cake pan. Set aside.

Cut pineapple into 1" chunks and blot them dry between several thicknesses of paper towel (press on them a little to extract excess juice).

For the batter, cream the butter and sugar until it is really fluffy. Under-beating the butter at this stage will give you a poor quality cake. When it is nice and fluffy, add the eggs (one at a time) and extracts and beat until its fluffy again.

Sift the flour, baking powder and cinnamon into a bowl. Add the flour mixture to the butter mixture in three parts, alternately with the pineapple juice (or milk) starting and ending with the flour. Set aside.

Assembly: Nestle the pineapple, pecans and cherry pieces down into the brown sugar mixture in the cake pan (arrange in pretty fashion because this will show). Pour the cake batter over the top and very gently spread it out.

Bake in 350 oven for 45 to 55 minutes or until a toothpick tests clean (my oven takes exactly 45 minutes). Remove from oven and sit pan on a cooling rack for 15 minutes. After 15 minutes, run a thin bladed knife around the edge of the cake and invert onto a serving plate and peel off the parchment paper. Serve cake warm or at room temperature.

NOTE: Traditionally, pineapple upside-down cake has pretty rings of pineapple with red cherries in the center of each ring. However, when the cake is baked like that, it is hard to eat. You either get a big unmanageable hunk of pineapple on your piece of cake or no pineapple at all (does that make sense?). Instead, I cut the pineapple into very small pieces (almost a dice) and arrange the cherries randomly over the cake. It is much easier to cut, serve and eat (even if it ISN'T traditional). If you use this diced pineapple style, it only takes two cups of diced fruit instead of three.

APPLE SNACKING CAKE

This old fashioned, super moist, snack cake is quick, easy and only takes ONE apple!! It is the PERFECT snacking cake and goes wonderfully in a lunch box.


1/3 cup brown sugar lightly packed
1 teaspoon ground cinnamon
2/3 cup white sugar
1/2 cup butter (room temperature)
2 eggs
1  1/2 teaspoons vanilla extract
1  1/2 cups flour
1  3/4 teaspoons baking powder
1/2 cup milk
1 large apple
 
Preheat oven to 350°F and grease and flour a 9"x5" loaf pan.
 
Core and peel the apple then pulse it in the food processor a few times until the pieces are about the size of a green pea.
 
Mix brown sugar and cinnamon together and set aside. 
 
Beat white sugar and butter together until smooth and creamy; beat in eggs, one at a time; add vanilla, flour and baking powder and beat until smooth, then stir in the milk and chopped apples, until the batter is well mixed.
 
Place 1/3 of the batter in the loaf pan and top with 1/3 of the sugar-cinnamon mixture; do that two more times, ending with sugar cinnamon.
 
Bake at 350°F for 30-40 minutes (my electric oven takes 40 minutes) or until toothpick tests clean.
 
Let cake cool in pan for about 10 minutes, then turn it out on a rack to cool.
 
This snacking cake definitely does NOT need any frosting, ENJOY!!


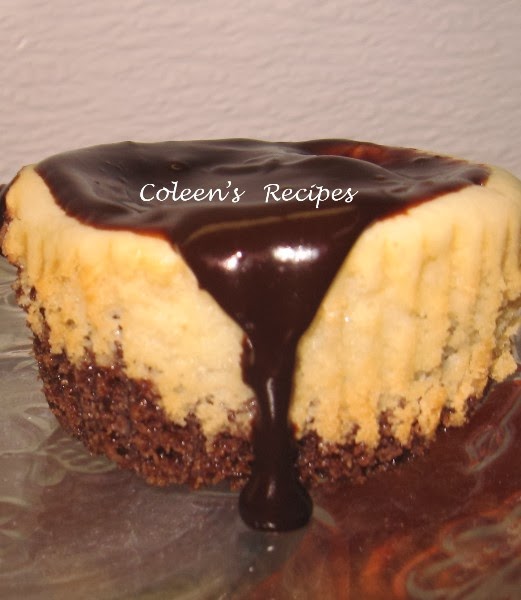
CHEESECAKE BROWNIE CUPCAKES

This recipe is a delightful combination of a brownie layer baked under a vanilla cheesecake layer; do I have your attention yet? 

They are delicious and seriously going onto my holiday dessert tray this year. If you like chocolate (duh!!) AND you like cheesecake (double duh!!) you will love these quick and simple treats.

 
Brownie Layer
1 ounce semi-sweet chocolate
1/4 cup butter
1 tablespoon cocoa powder
1/2 cup sugar
pinch salt
1 large egg
1 teaspoon vanilla
1/3 cup flour

Heat chocolate, cocoa and butter (I use my microwave) just until melted, then stir well and set aside to cool while you do the next step.

In another medium size bowl mix sugar, egg and vanilla till smooth; add melted chocolate/butter and flour and stir just until it looks well mixed (I do this by hand - no mixer); set aside.

Cheesecake Layer
8 ounce cream cheese (room temperature)
1/3 cup sugar
1 large egg
1 teaspoon vanilla

Using electric mixer, beat the cream cheese until it is very smooth. Add the sugar, egg and vanilla and continue mixing until creamy smooth.


Preheat oven to 350°. Line cupcake pan with 12 foil liners. If you don't have foil liners, you can use paper liners, but you will have to mist them with a little vegetable spray.

Put a very lightly rounded tablespoon of brownie batter in each cupcake foil and roughly spread it around a little.

Top the brownie layer with the cheesecake mixture, dividing it equally between the 12 cupcakes.
 
Bake for 30 minutes.  Remove from oven but do not remove from the cupcake pan. Let them sit at room temperature for 30 minutes, then chill in fridge (still in pan) for several hours.


I topped these little gems with a ganache (but you don't have to).  To make that, I just mixed a large handful of chocolate chips with 1/4 cup very hot (but not boiling) heavy cream, stirring until thick and smooth.

These are also very pretty at holiday time, topped with cherry pie filling and a swirl of whipped cream; it's sort of an individual black forest cake idea.


CAKE DECORATING 101

I don't profess to be a great cake decorator but I do "OK"; lets just say if I can do it, certainly YOU can do it; it isn't rocket science.

This post has a very good basic butter cream frosting recipe and a few tricks of the trade that I've learned over the years. Don't be nervous, just jump in and "give it a go". Practice makes perfect and your friends and family will love eating those "practice cakes" (our kids grew up on them).


BUTTER CREAM FROSTING

1 cup white Crisco vegetable shortening
1 cup butter (room temperature)
8 cups powdered sugar
1/4 teaspoon salt
3 teaspoons vanilla extract
1 teaspoon almond extract
2/3 cup heavy cream

With an electric mixer (stand mixer works best) beat the vegetable shortening and (room temperature) butter until it is well mixed together.

Add half of the powdered sugar, salt, extracts and half of the cream. Beat until very well mixed.

Add the last half of the powdered sugar and the last half of the cream.  Beat on high for 2 or 3 minutes until very fluffy (makes a lot of frosting).
 
 
NOTE: Some people freak out about shortening in the frosting and I understand that, but, remember.....when you buy a cake from a chain type bakery, the frosting is made with ALL shortening, trust me!!

If you are dead-set against using vegetable shortening, you CAN use all butter, but the taste is very heavy; it is your choice.

NOTE: This frosting is great for the entire cake including borders and piping words, etc., but it IS a soft frosting and it WILL melt if you have it out in the sun or in a very hot room.  I like to frost  my cakes and then chill them until about an hour before serving.

If you don't have time to freeze the cake, just make sure it is completely cooled before frosting it (not even just a LITTLE bit warm).

DECORATING TIPS

Cupcakes are very popular right now and they are super easy to do. Using the above frosting recipe and a Wilton M1 decorating tip, you can have cupcakes that look like they came from a bakery in no time; that big M1 tip is the secret.


The following mini-lesson, is for a simple "every day" one layer 9x13 cake.

1. Brush all the crumbs off of the cake (you will thank me later)because it is easy to get the crumbs mixed in with your frosting and that isn't pretty.

2. I like to wrap or cover my HOT cake with saran wrap (right on the surface of the cake) and then let it cool down and put the wrapped cake in the freezer overnight.  The day you want to serve the cake, take it out of the freezer and frost it while it's still frozen. A frozen cake is sturdy and the frosting stays right where you put it.
Don't put it back in the freezer!!  The frozen/frosted cake will thaw out in about 60-90 minutes and be perfect for serving.

3. Put a thick layer of frosting all over your cake; don't worry about it looking smooth at this point, just try to cover it evenly.


4. Now here is a little trick that I learned a million years ago. Get a small fine mist spray bottle (that isn't used for anything else) and fill it with cold water. Give the frosting a light mist (from the distance of about a foot(just a super quick fine spritz) then smooth the frosting with a smooth bladed knife(wiping off your knife in between each stroke).  I always use an off-set spatula for this (see photo below) but any non-serrated knife will work in a pinch.

If you don't have a spray bottle, you can almost get the same effect by dipping your spatula into very hot water (then shaking off all excess water) before smoothing your frosting. This next picture shows what just ONE SWIPE around the sides of this cake (using the warm wet knife method) will do; you can imagine if you went over it a couple more times.


 If you are a perfectionist  (which I am not) and want NO frosting lines, just keep smoothing.

IMPORTANT NOTE: Only use the spritz technique on white frosting. If you use it on colored frosting, it will run and make your frosting look uneven....especially blue or green.

5. You can go crazy and buy all sorts of decorating tips and doo-dads, but you certainly don't need them.  Get just get a few of the basics and you will be amazed at what you can do.

You will need:
Disposable plastic frosting bags (a true MUST)
2-3 couplers (2 piece couplers let you change tips)
Decorating tips  (a large star and a round writing tip)
Off-set spatula  (not an absolute must, but very handy)
Food color paste (not the watery stuff) Check Walmart
Water bottle for misting


After you "flat frost" the whole cake, it is time to put on the borders/trim and any writing or drawing  you want on the cake. Now is the time you will use the frosting bags and metal tips.


6. The disposable frosting bags are probably the handiest part of this process. You can use non-disposable ones, but once you try to wash one, you will quickly see the "beauty" in the disposable kind.

7. The couplers, are not absolutely necessary either. You can just slide the metal decorator tips down inside the frosting bag and snip off the end. However, if you want to use a variety of decorating tips, the coupler is the way to go. Each one has two pieces; the larger part slides down inside the frosting bag and then the metal tip fits onto it from the outside, then the coupler band is screwed on (does that make sense?)


Once you have the decorating tip on, nestle the decorator bag inside of a large mug or measuring cup and fold the top raw edge down over the container, sort of like folding down a collar. Now put a cup or two of frosting in the bag (the "container" is just to hold the bag steady while you fill it).

Twist the top of the frosting filled bag closed and apply pressure with your fingers. As the frosting comes out the end, you will have to re-twist it tighter before continuing. When you are done using the frosting bag, just use scissors to cut the bag off just above the coupler, then throw the coupler and tip into the dishwasher!!

The base of your cake should have the larger frosting border than the top edge of your cake. Practice making a shell pattern on some wax paper before you try it on the cake.


8. I like to use a Wilton M1 tip on my cake base; it is a huge star tip and it takes an over sized coupler as well.


NOTE: When you first start to decorate, you will be fairly slow. Keep in mind that the heat of your hands can soften the frosting in the frosting bag and that can be a problem. If you find it getting too soft to hold its shape, put it in the fridge for about 20 minutes.

NOTE: Don't use regular (watery) food coloring in this frosting recipe; not only will it effect the consistency of your frosting, but the colors will  never get any stronger than a pastel color. 

Get some food coloring paste (it is very concentrated and gives you very deep colors, so go easy with it at first); one drop of blue will color an entire bowl of frosting. 

Walmart sells the food color paste in their cake decorating section.

NOTE: A fun thing to try is edible glitter. It is basically a transparent food starch that has been dried and flaked, but you can sprinkle it on ANY color frosting and it will look shiny and sparkly; it is GREAT for cupcakes or little girl princess cakes.

Another fun decorating tip is called a grass tip.

Grass Tip
 
Using a grass tip is super easy, you just apply lots of pressure, then immediately release the pressure and lift up at the same time which will make "blades" of grass.
 
 
GIVE IT A TRY !! BUT MOST OF ALL ...


HAVE FUN !!!

KENTUCKY BUTTER CAKE

I'm not sure where I saw this cake for the first time, but I remember finding web page after web page saying how great this recipe was, so I knew I had to try it.

So, today was the day and all I have to say is: Holy Wack-a-Moley (as my grandchildren would say)it is delicious. Even picky-picky husband has had several pieces of cake today. 

It has a rich and moist butter-rum flavor and after it's baked (and still hot) you poke holes into the cake and drizzle over a butter-rum flavored syrup.I'm talking serious flavor here!!

The syrup finds its way down into the cake and the result is pure heaven. I hope you try it.

1 cup butter (room temperature)
2 cups sugar
1 teaspoon rum extract
1 teaspoon vanilla extract
4 eggs
3 cups all purpose flour
1/2 teaspoon baking soda
1 teaspoon baking powder
1 teaspoon salt
1 cup buttermilk

Grease and flour a 10" Bundt pan and preheat your oven to 325°F.
Beat the butter, sugar and extracts on medium high speed for about 3 minutes, scraping down the bowl once or twice.

Add the eggs, one at a time (beating after each) and once they are all included, beat for about another minute or so.

Mix the flour, baking soda, baking powder and salt together and add it to the butter mixture, alternately with the buttermilk (I added it in thirds).

This batter is nice and thick, so spoon it into the prepared Bundt pan and level out the top of the batter.

Bake at 325° for one hour or until a toothpick tests clean. My electric oven took exactly one hour.

Remove from oven and DO NOT REMOVE CAKE FROM THE PAN YET. Poke holes into the hot cake. I used the sharp end of my meat thermometer and it left a nice size hole. Don't poke the holes all the way down to the bottom of the pan, just about 3/4 of the way. I poked about 3 holes across, every two inches.  Drizzle syrup into holes.

SYRUP
3/4 cup sugar
1/3 cup butter
3 tablespoons water
1 teaspoon vanilla extract
1 teaspoon rum extract

Heat this until sugar dissolves and little bubbles form around the edge of the pan, but don't boil.

After you drizzle the syrup over the cake (while its still in the pan) let the cake cool in the pan for a couple of hours before you turn it out onto a serving plate (it won't stick to the pan).

NOTE: Next time I make this cake I plan to double the syrup and use half of it as instructed above, but the other half I will brush onto the cake after it comes out of the pan.  It dries  nice and shiny, so it will make a wonderful (thin) glaze.

Two Ingredient Cake !!

This cake couldn't be easier and it is light and refreshingly delicious. It is great for any occasion, but PERFECT when you have to have a last minute dessert.

It only takes two ingredients, mixed together with a spoon...Easy-Peasy!!

1  box of angel food cake mix (dry mix nothing else)
1  20 ounce can of crushed pineapple (do not drain)

That's it!!  Mix in a large bowl because it really foams up as you stir. Pour it into a 9 x 13 baking pan (sprayed with vegetable spray) and bake it at 350 for 25-30 minutes (my electric oven took about 28 minutes).

Remove from oven and cool in the pan for about 20  minutes, then turn out onto a serving tray (or just leave it in the pan!!)

I frost mine with sweetened whipped cream that I stirred a little coconut into.

What could be easier and it is VERY tasty!!

CLASSIC YELLOW CAKE

Everyone needs a great classic yellow cake recipe, so I would like to share mine. It is very moist, has a wonderful "scratch cake" flavor and texture and even though there are several steps in the recipe, they are all quick and easy.


1 cup butter (room temperature) no substitutions
1½ cups granulated sugar
8 egg YOLKS   (yes, EIGHT!!)
3/4 cup milk
2 teaspoons vanilla
2 cups cake flour  (see note below)
2 teaspoons baking powder
1/2 teaspoon salt

Preheat your oven to 350° and grease and flour two 9" cake pans that are at least 2" deep (this cake rises a lot!!)

Sift the cake flour, baking powder and salt together and set aside (I sift it twice).

Beat the butter and sugar together, on high, for two or three minutes, scraping down the sides of the bowl about once a minute.

Add the egg YOLKS, one at a time (important), beating well in between each yolk. Add the vanilla.

Now you will need to add the flour alternately with the milk; start with flour and ending with flour. Make sure you scrape the sides of the bowl once in a while. I add the flour about 1/2 cup at a time, then add a little milk, then another half cup of flour. Batter will be very thick, like this:

Divide batter into two prepared pans evenly; I like to use this recipe for cupcakes. If you make cupcakes, only fill the papers about 1/3 full.

Bake 9" layers in preheated 350° oven for 25-30 minutes. If you are making cupcakes, bake them for about 20 minutes or until golden on top. With either pan, the cake will spring back a little when lightly touched when it's fully cooked.

Cool the layer cakes about 10 minutes before you remove them from the pans. If you make cupcakes, just cool them for 2 or 3 minutes before you remove them from the pans.

NOTE: This recipe calls for two cups of cake flour. If you don't have any, you can substitute the following: put 1 tablespoon of cornstarch in a 1 cup measuring cup and then fill the cup with all purpose flour. This is a great substitution for cake flour. You will need to do this twice...once for each cup.

Super Moist Chocolate Cupcakes

I found this quick, easy, delightful recipe on the For the Love of Cooking web site. It makes one dozen super moist, super chocolate-y, super yummy cupcakes. This recipe is going into my "5 star file", that is for sure.
 
 
1/2 cup white sugar
1/2 cup brown sugar
3/4 cup + 2 tablespoons flour
1/4 cup + 2 tablespoons unsweetened cocoa powder
3/4 teaspoons baking soda
3/4 teaspoons baking powder
1/4 teaspoon salt
1 egg
1/2 cup milk
1/4 cup canola oil (I used vegetable oil)
1 teaspoon vanilla extract
1/2 cup BOILING water

Preheat the oven to 350° and line a cupcake pan with 12 paper liners.

Sift together all of the dry ingredients into a large bowl. Add the egg, milk, oil and vanilla and beat together with an electric mixer until combined.

Scrape the sides of the bowl and add the boiling water, mix until just combined but smooth.

The batter will be very watery looking, so don't be alarmed.  Pour the batter evenly into the paper liners.

Bake in preheated oven for 20-22 minutes or until a toothpick tests clean. Remove from oven and cool before frosting.


Do you have a craving for chocolate?
Give this a try, they are great.

PEANUT BUTTER SNACK CAKE

Are you old enough to remember the snack cake craze? Simple sweet cakes made for no special occasion, other than to just "snack on"; they were great. I don't  know when, or why, they faded from the scene, but I've decided to bring them back into my kitchen as a welcome change from the ever present cookie jar. Peanut butter cake, studded with mini-chocolate chips and frosted with a peanut butter and honey frosting...what's not to love?!
This cake is delicious and, if kept covered, stays moist for several days. The recipe ingredients listed here are for a 10" round cake, but you can double the ingredients and bake it in a 9"x13" pan as well.

1 cup all purpose flour
1 cup brown sugar (packed)
1/2 cup peanut butter
1/4 cup butter (room temperature)
1 teaspoon baking powder
1/2 teaspoon baking soda
1/2 cup milk
1 teaspoon vanilla
2 eggs
1/2 cup semi-sweet mini-chocolate chips

In the bowl of an electric mixer, beat the flour, sugar, peanut butter and butter until it is crumbly.

Add the rest of the ingredients (except the chocolate chips) and mix on low speed until everything is well combined, then mix on med-high speed for three minutes.

Dust the mini-chocolate chips with a tablespoon of flour and then shake off the excess (this will keep them from sinking in the batter as they bake). Stir chips into the batter.

Bake in a greased and floured 10" round pan at 350° fir 35-40 minutes or until toothpick tests clean (my electric oven took 35 minutes).

Cool in the pan for 10 minutes then turn out onto serving plate.
FROST THIS CAKE WHILE STILL HOT!!

PEANUT BUTTER AND HONEY FROSTING
1/2 cup peanut butter
2 tablespoons honey
1 teaspoon vanilla extract
2 cups powdered sugar
4 to 5 tablespoons milk
Warm the peanut butter and honey in the microwave until it is soft but not melted. Add the rest of the ingredients and beat with electric mixer until smooth and creamy.  FROST CAKE WHILE STILL HOT.

NOTE:  If you double this recipe for a 9"x13" cake, 
make sure you double the frosting as well.


Back to top