LEMON GINGER DETOX TEA

LEMON GINGER DETOX TEA

Soothing and full of flavor, this tea is a new staple. As I have finally given up my coffee habit, I'm replacing my morning routine with green teas and other herbal tonics to get me going in the morning. This lemon ginger tea has been a new welcome addition to my morning routines. I love that it has no caffeine but stimulates me at the same time. It's great in the morning as well as throughout the day. I may even add a green tea bag every now and then for a change and an extra kick. 

Let's talk about ginger, lemon and cayenne for a moment. They all hold wonderful healing benefits...

LEMON GINGER DETOX TEA

Lemons are a good source of vitamin C which is one of the most 'important antioxidants in nature'. These powerful antioxidants neutralize free radicals both inside and outside the cell. Free radicals can cause inflammation, the antioxidants in lemons are helpful for reducing inflammation and symptoms of arthritis. They also contain flavonoids to help attack and prevent certain cancer cells from growing. Lemons also hold antibiotic effects. This yellow oval fruit is full of healing properties and should be enjoyed regularly.

LEMON GINGER DETOX TEA 

Ginger, like lemons, also holds anti-inflammatory benefits (great for people with arthritis, like myself). It also eases gas and bloating, is helpful with motion sickness and helps promote healthy sweating which is great when one is feeling under the weather, sweating is a great way to get the toxins out. Ginger can be used in lots of recipes like soups, noodle dishes, dressings, drinks, etc. It's always handy to have fresh ginger root on hand for when the time calls. This tea is another great way to use up that ginger you have laying around!

LEMON GINGER DETOX TEALEMON GINGER DETOX TEA

Cayenne is another spice that helps to fight inflammation. It can also help clear congestion as well as act as a natural pain reliever. It can help with weight loss and give your immune system a boost with its high content of beta-carotene. Not only will it add a spicy kick to your food/drinks, it will take care of you on the inside as well. 

Power up throughout the day with a cup of this simple, flavorful and healing tea. For every bit of its healing effects, it tastes twice as good!

LEMON GINGER DETOX TEA

Lemon Ginger Detox Tea

Ingredients
  • 1 3/4 cups water
  • 1 inch ginger, peeled and thinly sliced
  • 1/2 large lemon, squeezed
  • pinch of cayenne
  • 1/4 teaspoon raw, coconut or organic sugar or maple syrup (optional)

Heat water to boiling. Pour water into your cup, add ginger, let set for a few minutes, add lemon, cayenne and sweetener. Stir and enjoy!

Serves one.

Notes:

Alternately, if using a small sauce pan to heat your water, add the ginger to the water and then heat. I use a tea kettle to heat my water and prefer to add my ginger once the water is heated and poured. 

The amount of water called for here will fill an extra large mug like the one shown. Adjust the water and ingredients slightly to suit your mug size and/or serving size. 


Green Salad + Chickpeas + Lemon-Tahini Dressing

Green Salad + Chickpeas + Lemon-Tahini Dressing

Summer is still here and salads are my go to meals this time of year. For the last few weeks I've been trading between all my salad posts from the last month and have come back to this one here that I shared on Instagram not too long ago. It's such a simple salad and needed to be added to the recipe collection. This is just one of those salads that I threw together in a pinch while cleaning the fridge and it tasted delicious. So, here it is for you to play with as is or make it your own by adding anything that sounds good to you! It's really a great little salad...easy breezy vegan!

Green Salad + Chickpeas + Lemon-Tahini Dressing

Green Salad + Chickpeas + Lemon-Tahini Dressing

Salad
  • 1 can (15oz) garbanzo beans (chickpeas), drained and rinsed
  • spring salad mix, or any salad mix you prefer
  • handful grape or cherry tomatoes, halved 
  • 1 shallot, thinly sliced
  • micro greens, optional
  • mineral salt & fresh cracked pepper, to taste

 Lemon-Tahini Dressing
  • 4 tablespoons tahini
  • juice of one large lemon
  • dash of mineral salt
  • dash of garlic salt
  • dash of cayenne pepper
  • 2-3 tablespoons water or lemon juice, as needed to thin

Start with your dressing by combing all the ingredients except for the water. Taste for flavor adding any extra you might like. Add the water or lemon juice one tablespoon at a time as needed to thin to desired consistency. 

Prepare your salad, layer as you like adding half the chickpeas and top with dressing. Serves two.

As with most salad recipes, use however much you like of each salad ingredient!

Enjoy!

Carrot Miso Soup

Carrot Miso Soup
Carrot Miso Soup

This wonderful soup comes from the Smitten Kitchen. It's the simplest of ingredients with such great flavor. Yes, there are a lot of carrots involved but carrots are really on the cheap. I can pick up a 5 lb bag of organic carrots for under $5 making this a very inexpensive soup to prepare (double the recipe and store in the freezer for later if you like). The miso costs a bit more at around $8-9 a tub but will last up to a year + in the fridge. If you follow my recipes you will be sure to use it more than once. The miso compliments this soup beautifully making it a classic favorite. I love miso for its flavor and health benefits, it is quite unusual and irreplaceable. The only changes I made to Deb's recipe was adding a little tofu to round this soup out with some protein. I have chosen to use a silken tofu, sliced and topped with a bit of cayenne for a little kick of spice. The tofu is soft and silky blending in almost seamlessly with each bite and the cayenne adds a bit of warmth. So delicious! Feel free to omit the tofu if you're not a fan. And if you are a fan, feel free to add more for extra protein. 

Carrot Miso Soup

Carrot Miso Soup 

Ingredients
  • 2 tablespoons sesame oil
  • 2 - 2 1/2 pounds carrots, peeled and chopped
  • 1 large onion, diced
  • 4 garlic cloves, minced
  • 1 1/2 tablespoons fresh ginger, finely grated 
  • 4 cups water or vegetable broth (I used water)
  • 1/4 cup (4 tablespoons) white miso paste
  • 8 oz. organic silken tofu, sliced thin and at room temperature
  • cayenne pepper as garnish, to taste 
  • chives, chopped OR scallions, thinly sliced

In a large dutch oven or pot, heat oil over medium heat, add onion, carrots and garlic, saute until onion is translucent, about 7 minutes. Add liquids and ginger. Cover and simmer, stirring occasionally for 30 minutes, or until carrots are tender.

Let soup cool a bit. Add miso to soup and puree using 1 of 3 methods: An immersion blender right in the por, a food processor or a regular blender. You may have to puree the latter two methods in batches.

Add a bit more water as needed. Taste for seasoning adding salt, especially if you didn't use veggie stock you may like to add salt. Add pepper, more miso or grated ginger to taste.

Slice your tofu, ladle your soup into serving bowls, top with tofu, a sprinkle of cayenne for some heat and a nice bunch of chives or scallions.

Enjoy!


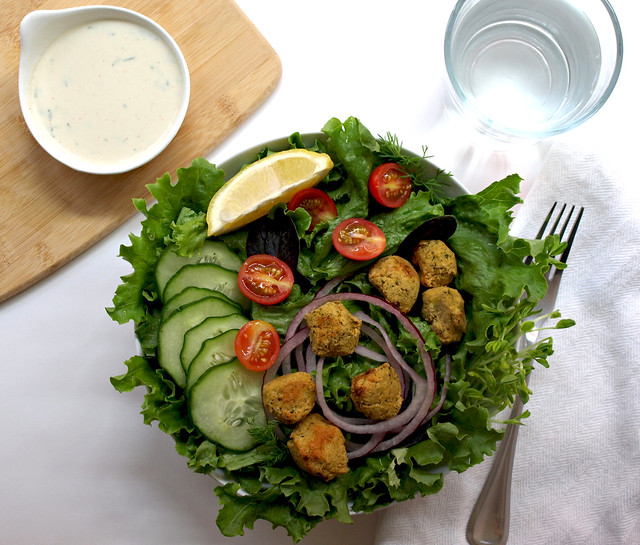
Baked Falafel Salad + Two Creamy Dressings

Baked Falafel + Two Creamy Dressings

Chickpeas are an amazing bean and I'm finding out just how versatile they are. I've used chickpea's in a lentil stew, roasted them with spices for snacking on and used them on top of salads. They are the main ingredient in hummus, which is just as versatile as the chickpea itself. They are great freshly cooked and I have no problem snacking on them just like that. They also make good things like socca bread and chickpea omelets (recipes coming soon). Its flour can be used and combined with other gluten free flours to make gluten free baked items too. And now, I come across the falafel, another great way to use chickpeas. High in protein and full of fiber, anything made with chickpeas is a great addition to a healthy lifestyle.

This last week I've been falafel making and am here to share with you my experiences. Falafels are a Mediterranean food and can be used in various ways like in salads, or made into sandwiches using pita bread and the ingredients of the salad base within this recipe along with a nice drizzle of dressing. You can also enjoy them by simply pairing your falafels with hummus, a flat bread and fruit (fresh grapes come to mind) for a great snack or simple meal. Along with the falafel recipe are two creamy style dressings. One is a more traditional dressing using tahini as the base while the other is not so traditional using avocado and cucumber. The avocado and cucumber dressing is inspired by my Avocado & Cucumber Soup and works great as a dressing too. I loved them both and decided to add them together for varying tastes. Hope you enjoy them!

Baked Falafel Salad + Two Creamy Dressings

Let me share with you a bit about my trials of falafel making. I have used canned beans and dried beans that have been soaked. It's important to soak them for at least 12 hours so they soften all the way through, but it's ideal to soak for 18 + hours and rinse well (this will help with gassiness and allow your body to absorb more of their nutrients). For me, both the canned and soaked beans worked out great without any issues. Use whatever style bean you prefer, or is convenient. You may like to try both for yourself to see which one you like best, I had no preference. I also made them with added flour and/or oil like some recipes call for. I personally found the flour and oil to not be necessary. I've baked my falafels in a skillet and on cookie sheets, both work great. I've also added a few extra ingredients like coriander which is nice but have omitted it here just to keep it simple as possible (although I do have the garlic & onion powder...I like them for good measure). But by all means, if you have coriander on hand go ahead and throw in a teaspoon if you like. As for the greens, feel free to use only parsley or cilantro if you like. That's a little about my experiences. I'm sure there is more to learn and each of us will have varying outcomes due to our kitchen appliances, tools and taste. All in all, these were great falafels and I see them being made fairly regularly around here!

Baked Falafel + Two Creamy Dressings

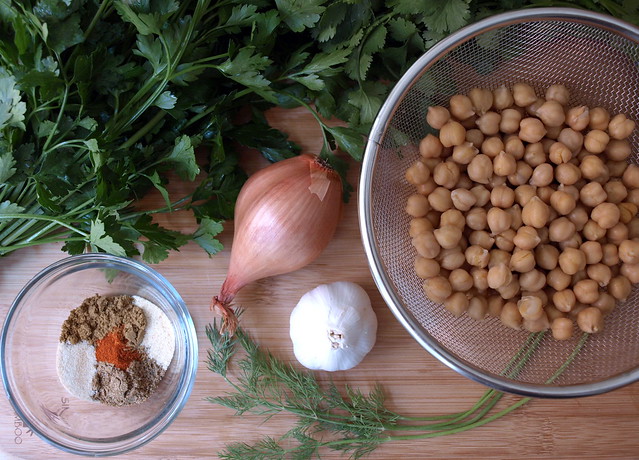
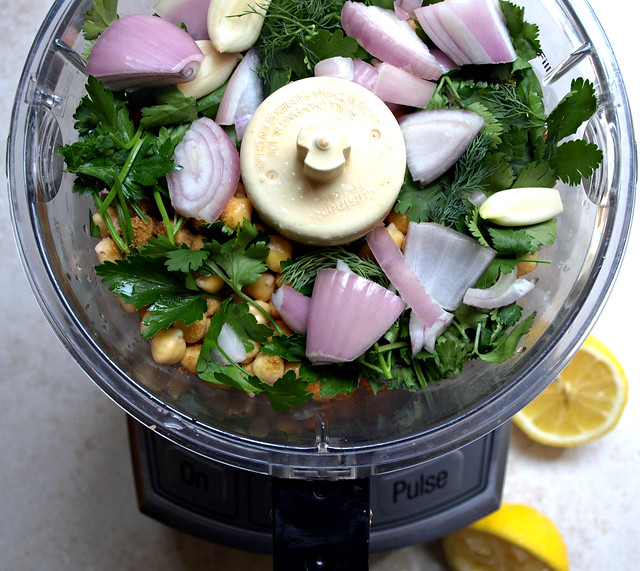
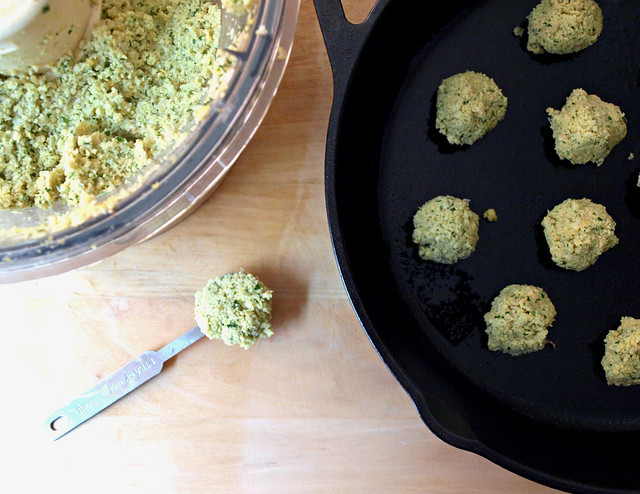
Start by adding the ingredients to your food processor/blender...

Baked Falafel + Two Creamy Dressings

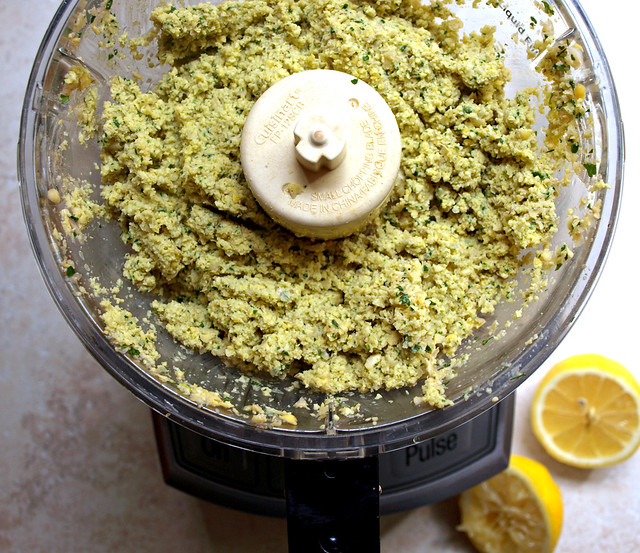
Blend until fairly smooth, stopping every now and then to scrap down the sides. And then your on to shaping your falafels into whatever size you like.

Baked Falafel + Two Creamy Dressings

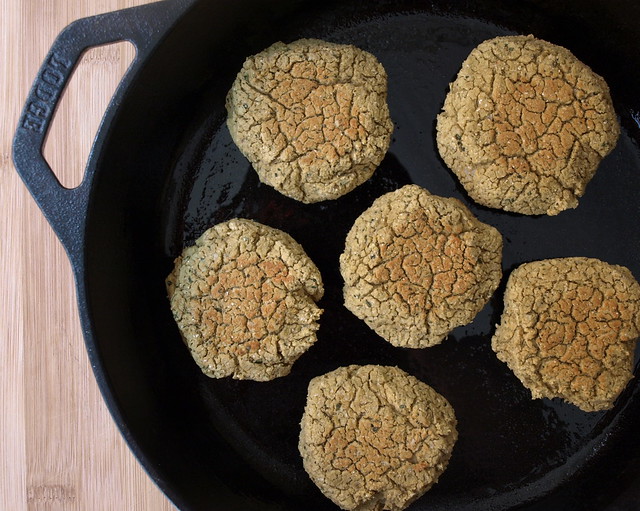
These were some bite size falafels I made using a heaping teaspoon to scoop up the mixture, this yielded about 24 or so mini falafels. The ones below are the larger patties which I used approx 3 tablespoons per patty and yielded about 6. You can vary your size according to your needs and uses. All the ways I baked them they came out nicely firm on the outside and perfectly cooked on the inside, soft and tender. I know the ones below looked like a parched desert but trust me they weren't dry on the inside.

Baked Falafel + Two Creamy Dressings

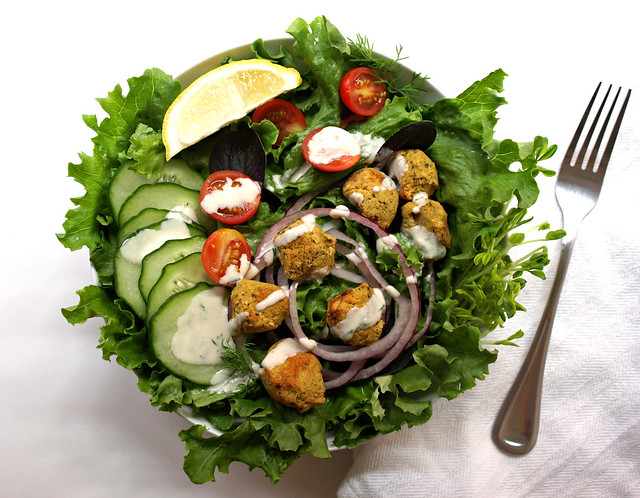
Once your falafels are baked...make your salad or enjoy them however you like!

Baked Falafel + Two Creamy Dressings

Baked Falafal Salad + Two Creamy Dressings

Salad Base
  • spring mix or choice of leafy greens
  • red onion, thinly sliced
  • tomatoes, sliced 
  • cucumber, thinly sliced

Falafals
  • 1 can (15oz) garbanzo beans, drained and rinsed OR 3/4 heaping cup garbanzo beans soaked for at least 18 hours and drained (they will double in size)
  • 1/4 cup loosely packed cilantro, chopped
  • 1/4 cup loosely packed parsley, chopped
  • 3 tablespoons fresh dill, chopped (optional)
  • 1 small shallot or 1/2 small onion, roughly chopped
  • 3 garlic cloves
  • 1 teaspoon cumin
  • 1/2 teaspoon garlic powder
  • 1/2 teaspoon onion powder
  • pinch or two cayenne pepper, chili powder or smoked paprika (depending on your mood)
  • himalayan salt & freshly cracked pepper to taste

Preheat oven to 400. Coat your cast iron skillet or cookie sheet with coconut oil, or oil of choice.

In food processor/blender, combine all the ingredients for the falafels. Blend until fairly smooth. Form patties into whatever size you like....

For larger patties: Scoop 3 tablespoons per patty...will yield approx. 6.

For small patties: Scoop 1 heaping tablespoon per patty...will yield approx. 12.

For mini patties: Scoop 1 heaping teaspoon...will yield approx. 24.

Place patties on greased skillet/cookie sheet and bake for 10 minutes. Flip and bake for 15 minutes.  Total cooking time 25 minutes. If you find that your falafels are not as browned as you like, place them under the broiler for a minute or two, just be sure to keep an eye on them so they don't burn.

Store leftover falafels in an air tight container. They will soften overnight. To warm them up and return crispness again to the outside, place under broiler or in a toaster oven at a high temp for a minute or two while keeping an eye on them so they don't burn. 


Lemon-Tahini Dressing 
  • 4 tablespoons tahini
  • 1 garlic clove, pressed OR a dash or two garlic powder
  • juice of 1 large lemon
  • few dill fronds, cilantro or parsley, minced 
  • himalayan salt to taste
  • 1/3 cup water, + more to thin
  • pinch of cayenne

In a small bowl, combine all ingredients and mix until well combined. Taste for seasoning and add more water as needed 1 tablespoon at a time or add more lemon juice. Store leftovers in an air tight container in the refrigerator for up to five days.


OR, for something different and refreshing...


Baked Falafel + Two Creamy Dressings

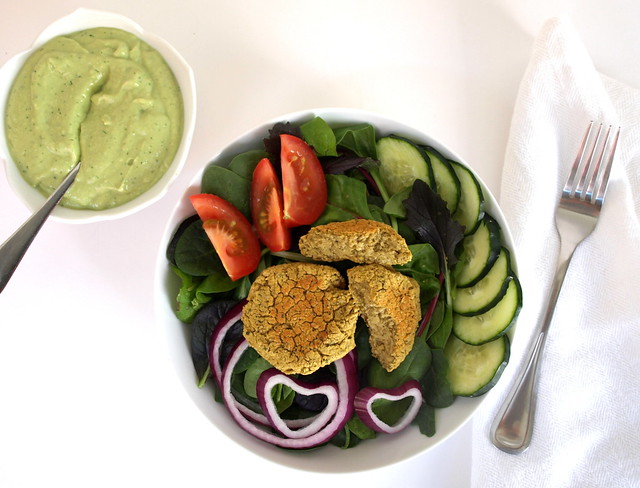
Avocado-Cucumber Dressing 
  • 1 avocado
  • 1 cucumber, peeled
  • a few springs cilantro and dill fronds
  • 1 clove garlic
  • juice of 1/2 lemon
  • dash of onion powder
  • salt to taste
  • water as needed to thin

In food processor/blender, combine all the ingredients except for the water. Blend until smooth. Taste for seasoning. Add water a tablespoon or two at a time until desired consistency. Best chilled in the refrigerator before serving. Leftovers will hold up a day or two in a sealed container in the refrigerator. It may last a little longer but it's gone by day two around my house.


Once patties are ready, make your salad, top with falafels and dressing.

Enjoy!

How do you like your falafels? I like to experiment and would love to hear any suggestions and ideas!

Winner! Mac & Cheese Bake

Vegan Mac & Cheese Bake

Winner, Winner....Mac & Cheese Dinner!

Vegan Mac & Cheese Bake

First off, let me say that this was a supreme hit with my 12 year old daughter who usually turns her nose up at almost everything I make! As a matter of fact, I hear her in the kitchen right now nibbling on the left overs...this is a good day. We have a winner here...this mac & cheese bake will hit the spot for the kids, just don't say a word about what's in it. ;) Now had I added veggies in the bake, it would not have passed which is why this is just a simple recipe. Feel free to add in veggies like broccoli, kale, etc...whatever you may usually add into a mac & cheese bake! 

Vegan Mac & Cheese Bake

As for myself, I seriously could have sat there and ate this whole thing myself. I haven't had a mac & cheese bake in I don't know how long. The cheese is just great! I especially love the bread crumbs and the light dusting of smoked paprika I added on top of my portion. I paired mine with some sauteed Tuscan kale which was terrific! 

Vegan Mac & Cheese Bake

Vegan Mac & Cheese Bake

Ingredients
  • 16 oz. package pasta of choice (I used rice penne pasta) (works with an 8oz package too)
  • paprika, garnish

For the bread crumb topping
  • two pieces of bread or 1 cup bread crumbs 
  • tablespoon olive oil
  • twist or two of the salt grinder

Cheese Sauce
  • 1 1/2 cup raw cashews, preferably soaked for a 2 -3 hours (aides in digestion)
  • 1 3/4 cups water or unsweetened almond milk, or combo like I did
  • 1/3 cup nutritional yeast
  • juice of one large lemon or 1 tablespoon vinegar
  • 1 clove garlic
  • 2 tablespoons of extra virgin olive oil
  • 1 tablespoon white miso
  • 1 teaspoon onion powder
  • 1 teaspoon sea salt, or to taste
  • 1/4 to 1/2 teaspoon chili powder, to taste*
  • 1/8 teaspoon turmeric
  • dash of cayenne powder 

    Preheat oven to 350 degrees.

    Bring a large pot of water to a boil, cook your noodles al dente and set aside.

    While waiting for the water to boil, start with your bread topping first. I toasted two pieces of bread we had on hand really well and processed them in the food processor until crumbly, a high speed blender will work too. Place the crumbs in a small bowl, drizzle with olive oil and a twist or two of the salt grinder, mix well and set aside. Quickly rinse the processor/blender bowl and move on to the cheese sauce.

    For the cheese sauce: In food processor/blender, combine all of the cheese sauce ingredients except for about 1/2 of the water/milk and blend until creamy. Add remaining water/milk and blend again. Taste for flavor adding anything extra to suit your taste.

    Once pasta is cooked and drained. Add pasta back to the pot it was cooked in, add the cheese sauce and combine well. It may seem like too much liquid but the pasta will take care of most of it.

    In baking dish, pour mac & cheese and top with bread crumbs. Bake for 25 - 30 minutes, check after 15 minutes if crumbs are darkening too much for your liking, cover with foil.

    When done, let cool about 10 minutes and serve. The sauce will thicken upon standing.

    * The chili pepper adds a really nice flavor without being too powerful. If your worried about the spiciness, especially for the little ones, I would suggest using the smaller amount, taste and add more if desired.

    Notes: If you use a smaller baking dish or use ramekins, lessen the cooking time to 10 - 20 minutes depending on the size of dish you use.


    Enjoy!

    Why I ♥ this cheese so much is not only does it taste fantastic and its easy to make, but also because not one cow was harmed, or had their baby taken away, or just simply had to live a life of misery in order to satisfy a taste we have come accustomed to without even realizing how these animals are handled, especially through factory farming. That in itself makes all dairy products undesirable to me. I began my vegan journey for health reasons and soon found out just how unpleasant the meat and dairy industry really is. It is not a question of whether it's wrong or right to consume animals and their products...that depends on your circumstances. But I do believe that in this day and age we live in we simply do not need them to survive, and we definitely do not need to factory farm them the way it is being done.

    Veganism for me is liberation for ALL sentient beings! And it most certainly starts with my fork. :)

    To find out more about the life of factory farmed animals and animal rights you can visit PETA.org for more information.

    Spaghetti Squash & Italian Bean Balls

    Spaghetti Squash & Italian Bean Balls

    If you've never had spaghetti squash, you are in for a surprise. It really is a great replacement for pasta for those looking for a change, or just wanting to stay away from the wheat and rice pasta alternatives. It does have a little crunch but it's very pleasant, the texture reminds me a little of kelp noodles if you're familiar with those. Spaghetti squash contains lots of nutrients, including folic acid, potassium, vitamin A & C, and it's low in calories containing about 42 calories per serving. It's just so colorful too. I can definitely get used to this and incorporate it into my meal rotations every now and then.

    Spaghetti Squash & Italian Bean Balls

    This is my second time having spaghetti squash. The first time was with just sauce and that was delicious by itself. But I decided if I was going to do a recipe it would be best to add in some bean balls as well just to make it a more rounded meal. And it was, this was very filling and the bean balls came out great. They definitely added more protein per serving to this meal and left me completely content for quite a few hours.

    Spaghetti Squash & Italian Bean BallsSpaghetti Squash & Italian Bean Balls

    I really wanted the bean ball recipe to be easy, using things you may already keep on hand so you can whip these up without too much planning and/or work involved. I also wanted to make this with an option for being low fat, as well as for people with nut allergies, you can add the nuts/seeds if you wish. I did this batch without any nuts/seeds. Adding them into the mixture will give an extra dose of protein, texture and hardiness to the bean balls. You may think they look a little dry coming from the oven (dipping them in sauce right before serving will greatly help that), but once you put some sauce on top they come to life. Honestly, I actually found myself munching on the leftover bean balls the rest of the day without any sauce. They held together extremely well too!

    Spaghetti Squash & Italian Bean Balls

    Spaghetti Squash & Italian Bean Balls

    Ingredients
    • 1 large or 2 small spaghetti squash, seeds removed
    • 1 jar (25oz.) organic pasta sauce of choice
    Bean Balls
    • 1 heaping cup of mushrooms (about 4 oz), sliced (I used cremini)
    • 1 small yellow onion, diced
    • 2 cloves garlic, minced
    • 1 tablespoon olive or grapeseed oil, to saute
    • 1/2 cup walnuts or sunflower seeds, optional
    • 1 can (15oz) cannellini, kidney or black beans, drained and rinsed (I used cannellini)
    • 1 cup of quick oats
    • 1 tablespoon dried oregano, basil, thyme or Italian seasonings (or a mixture of these)
    • 1/2 teaspoon garlic powder
    • dash or two of cayenne pepper or red pepper flakes, to taste
    • sea salt and cracked pepper, to taste

    Preheat oven to 375 degrees.

    Cut spaghetti squash in half lengthwise, remove seeds and place in roasting pan or baking dish, cut side up. If you like you can coat with a thin layer of olive oil and a sprinkle of salt & pepper. Add about 1/4 inch of water to the dish and bake on bottom rack for 45 - 50 minutes. (You will be adding the bean balls to the middle rack about half way through.) EDIT: Alternately, you can place squash cut side down (without oil and seasonings), add 1/4 inch of water to the dish and bake the same as above (this has been my preferred method lately). 

    Start assembling the bean balls. Saute onions, mushrooms and garlic over medium heat for 5 minutes and let cool. If using the nuts/seeds, place in food processor first and pulse until coarsely ground, and continue. Also, if using old fashioned oats place them in the with the nuts to chop then up a bit. In food processor place beans, sauteed veggies, oats and herbs and spices. Pulse until just combined. Taste for seasoning adding anything extra you may like. I added in some fresh chopped basil I had on hand.

    Roll into balls, about 1 1/2 - 2 inches, and place on a baking sheet. I was able to get 9 jumbo sized bean balls. Put in the oven on the middle rack for the remaining 25-30 minutes of the squash cooking time, they should get at least 20 minutes. Remove both when time is up and let cool. OR...you can also cook the balls in a saute pan using a little olive oil over medium to medium high heat, turning often enough so that all sides brown (I used the oven method here).
    spaghetti squash

    In the meantime, heat your sauce. When ready to assemble, using a fork scrape the insides of the squash horizontally all the way around. It will pull easily from the sides resembling 'noodles'. You will have more squash noodles than you might expect, enough to serve two with one good sized squash.

    Serve squash 'noodles' topped with bean balls, sauce, fresh cracked pepper, salt and some chopped fresh parsley or basil. A nice dusting of Almond Parmesan will also enhance this dish!

    Serves 3 - 4. Store leftovers in an air tight container for up to five days. Leftovers were great!

    Notes:

    If you don't have quick oats, use regular oats but process gently into a very rough flour. Also, replace the oats with breadcrumbs if you prefer.

    Try dipping your bean balls in the sauce just before serving, this will greatly enhance the visual appeal as well giving it a nice flavorful coating.

    Sub in zucchini noodles, gently heated, or any pasta of choice if spaghetti squash is not available. 

    Spaghetti Squash & Italian Bean Balls

    Enjoy!

    Adapted from these recipes: Whole Foods and The Vegan Stoner

    CURRY LENTIL & GREENS SOUP

    Curry Lentil & Greens Soup

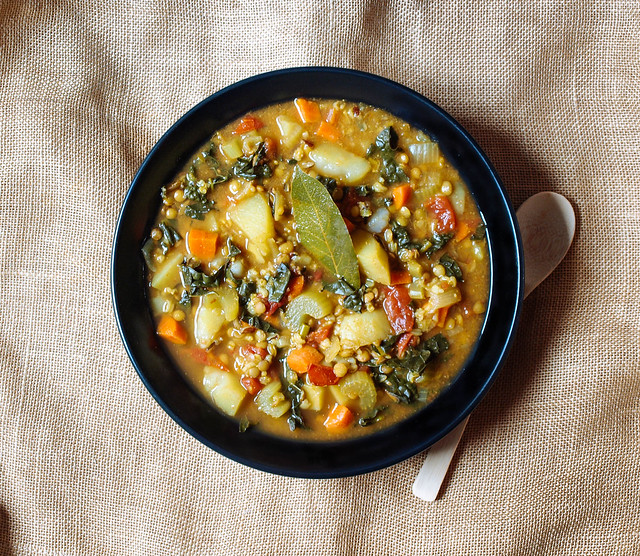
    Soup season is underway. Still a little warm here but the sun is going down early making for cooler nights. This is a most delicious and nutritious meal on these cool nights, great for afternoons too. Use whatever greens you like...spinach, rainbow chard, beet greens...I had kale on hand for this round. Easy one pot dish ready in about an hour from start to finish. Will definitely be having this again....very flavorful with a hint of spiciness. Simply a lovely hearty soup for everyone to enjoy!

    Edit: I have finally updated the pictures and recipe for this soup on 11/12/14. I didn't change much about the recipe except use less cumin. If you love cumin feel free to add 1 tablespoon. As an after thought I added a handful of currants to the soup. It was just what it needed, adding a bit of sweetness gives a nice contrast to the curry making it perfect! 

    CURRY LENTIL & GREENS SOUP

    CURRY LENTIL & GREENS SOUP

    Ingredients
    • 2 tablespoon extra virgin olive oil or 1/4 cup water (for water saute)
    • 1 small onion, diced
    • 2 stalks celery, diced
    • 2 carrots, diced
    • 1 tablespoon red curry paste or tomato paste
    • 3 garlic cloves, minced or 1 teaspoon garlic powder
    • 2 tablespoons curry powder
    • 1 - 2 teaspoons cumin 
    • 1/2 teaspoon red pepper flakes
    • 4 organic roma tomatoes, diced or 1 can (15 oz) diced tomatoes with juice
    • 3 bay leaves
    • 1 cup uncooked lentils or 2/3 cup lentils + 1/3 cup wild or black rice
    • mineral salt & fresh cracked pepper to taste
    • 6 cups water or vegetable broth (or combo)
    • 3 potatoes, diced 
    • 1 bunch or package greens (I used kale, julienned)
    • raisins or currants, to garnish, optional

    In large stock pot, heat olive oil/water over medium heat. Add carrots, celery and onions, saute for 5 minutes. Add the curry/tomato paste and garlic, stir to combine and cook for 3 minutes. Add the curry, cumin and red pepper, mix to combine and cook for 3 more minutes. Add lentils, tomatoes, potatoes, then water/broth (in this order the tomatoes and potatoes won't splash), bay leaves, salt and pepper, bring to boil over medium high heat. Turn heat to low, cover and simmer for 35 min. Add the greens after the soup has been cooking for 15 minutes and continue to cook stir occasionally. Add additional water as needed, maybe up to 1 cup.

    Serve with crusty bread.

    Serves 4 - 6.

    Notes:

    Use any dark leafy greens you like....spinach, kale, swiss chard, broccoli raab greens, beet greens ect. Just be sure to julienne your greens if they are large leafy ones.

    Discard the bay leaves, or at least don't eat them. I have one shown in the soup just for the photo.

    Add in a handful of raisins or currants for some sweetness at the end of cooking. Or, you may rather add some to the top of your individual servings. It's highly recommended!

    If you're a big fan of cumin, add 1 tablespoon like the original recipe calls for.


    Blackened Tofu, Stir Fried Kale & Quinoa


     My new favorite way of eating kale is stir frying it in my wok. I actually crave this stuff and make a whole bundle and eat it all by itself for dinner. I know I eat a lot of things some people would think is weird but this is really delicious in my book! I also know many of you who have a love of kale will just love this stir fry. For tonight's dinner I decided to serve it with some blacken tofu....now we're really cooking! Blackened tofu, kale and quinoa....I'm loving these Superfoods. :)

    Let's begin with the kale...the king of the leafy greens!


    Stir Fried Kale

    Ingredients
    • kale, I used 10oz organic package from Trader Joe's
    • 2 tablespoon of nutritional yeast, fine ground
    • 1 teaspoon garlic powder
    • 2 tablespoons sesame oil
    • salt to taste
    • sesame seeds to garnish

    In large wok or saute pan heat oil on medium high. Add kale and stir fry for about a minute. Sprinkle nutritional yeast and garlic powder over top, turning and moving the kale around to get all the spices mixed well throughout the kale. Continue stir frying for another four to five minutes. You may leave a cover on for a minute here and there in between stir frying to help soften the kale. When kale turns bright green it's about ready to be removed from heat. Test a piece and see if it's too your liking, if not stir fry a little longer. Some may like it crisp and some may like it softer. Serve with a sprinkle of sesame seeds on top.

    On to the blackened tofu that was such a nice accompaniment...


    Blackened Tofu

    Ingredients
    • one block firm or extra firm organic tofu
    • 2 tablespoons tamari, bragg's liquid amino's or soy sauce
    • 1 tablespoon sesame oil

    Spice Blend
    • 2 teaspoons paprika
    • 1 teaspoon black or white pepper
    • 1 teaspoon cornstarch
    • 1 teaspoon garlic powder
    • 1 teaspoon onion powder
    • 1/2 teaspoon salt
    • 1/4 teaspoon thyme
    • 1/8 teaspoon cayenne pepper

    Open and drain tofu. Slice tofu into slabs, whatever size you prefer. Press tofu between paper towels or cloth to remove excess moisture. In a shallow dish place tofu and tamari, bragg's or soy sauce and let set a few minutes, turn after a few minutes to let the other side soak.

    In medium size bowl, combine all spice blend ingredients and mix until blended. This is fairly spicy so you may consider using less black pepper and/or cayenne.

    In saute pan, heat oil on medium high heat. Place tofu pieces in spice blend, press gently to get a good coating, turn and repeat on the other side. Place coated tofu onto saute pan and cook a few minutes on each side. They will  blacken nicely as they should and be so tasty! Serve with quinoa, rice, kale or anything that calls to you. Serves four. I used half a block and kept the spice measurements the same.

    Let's do some quinoa, another Superfood! I finally got the right way to cook it that I like...


    Quinoa

    Ingredients
    • 1 cup quinoa, I used tri-color from Trader Joe's
    • 1 1/2 cups water
    • 1/2 teaspoon garlic powder
    • salt to taste

    Rinse your quinoa under cool running water for about a minute or two to remove any dust. If you forego this step your quinoa will have a bitter taste. Well worth the step. In medium to large pot add quinoa and water, bring to a boil. Cover and simmer for 15-20 min. Once done stir and let set for 10 minutes uncovered to rest and soak up any excess water. Stir once again before serving. It will be a perfect quinoa, fluffy and sprouted.

    I love quinoa, it can be eaten alone or served with so many other veggies and fruits. Season for the dish you are serving it with, or don't use any seasoning at all...it's really good all by itself. The other day I had some left over quinoa and black beans in the fridge and decided to mix them together and serve it cold with lots of strawberries in the mix....sounds weird but it was so good! Anyhow tonight it is served with blackened tofu and kale. :)


    Enjoy !

    Blackened tofu inspired by this recipe at Daily Garnish....Great visual instructions as well!

    SANTA FE BLACK BEAN BURGER

    Santa Fe Black Bean Burger
    Santa Fe Black Bean Burger

    The black bean burger...a great go-to meal on the fly. When you need a delicious healthy meal fairly quick without breaking the bank, this is a great recipe. Black beans are a staple in my pantry, they are a great basic item to have handy. Full of protein, fiber and flavor with a few spices added. Nothing here to weigh you down and you will be completely satisfied! I've also paired this burger on top of a bed o quinoa and let me tell you it was so good! I try to limit breads and figured it  would work great and it did. For show I have it paired on a thin burger bun, or sandwich thin as it's really called. You could also place a patty on top of some leafy greens for a really fresh take on the recipe. Anyway you have it, this is an awesome and simple burger to pull together in a cinch! 

    Santa Fe Black Bean Burger

    SANTA FE BLACK BEAN BURGER

    Ingredients
    • 1 can (14 oz) organic black beans, drained and rinsed
    • 1/4 cup oats (I use GF)
    • 1/4 cup whole wheat flour, or flour of choice*
    • 3/4 teaspoon cumin
    • 1/2 teaspoon cayenne
    • 1/2 teaspoon garlic powder
    • 1/2 teaspoon himalayan salt
    • 1/4 cup chunky salsa or pico de gallo, give or take
    • 1 tablespoon sesame or olive oil
    • corn meal, for dusting (I used course grind) (optional)

    Directions
    1. Drain and rinse black beans in colander. In a medium size bowl mash black beans with a strong fork or use a potato masher, leaving some chunks for texture if you like. Once done add oats, flour, spices, salt and salsa, mix again, feel free to use your hands if you like too. If mixture is too wet, add more flour to the mix but really it should be ok. Shape your patties into whatever size you like. I like to make two good size patties or three smaller ones. Give a light dusting of corn meal if you have it, it will give a nice crunch, flavor, and cook up crispy. 
    2. Heat 1 tablespoon oil in a skillet on medium. Cook for about 5 five minutes each side. It's ok if the cornmeal gets a little crispy. Trust me it's delicious!
    3. Serve with your choice of accompaniments such as red onion slices, leafy greens, and/or salsa. Add some mashed avocado as spread, or sliced avocado if you prefer. Or serve on a quinoa like I have shown below, or bed of leafy greens. Have fun using this burger in different ways...change it up a little.

    Notes: 

    To make gluten free, sub in gluten free all-purpose flour, oat flour, rice or almond flour. I use the gluten free all-purpose flour with great success. 

    You can easily make extras and refrigerate for snacking, lunches and/or dinners later. 


    Mash beans, add ingredients...


     Oops, almost forgot the salsa ;), mix well making sure there is no flour clumps...


    Shape into patties, two or three, and cook. Easy as that, and cooks up beautifully.

    Santa Fe Black Bean Burger

    Add your fixin's and enjoy!

    Lovingly adapted from Made to Create


    Raw Vegan Sushi Rolls


    First time making sushi rolls, really enjoyed putting these together. Since I've never been a fan of all the rice used in sushi rolls this was right up my alley since I prefer to fill up on veggies. I enjoyed three of these rolls all to myself ! One day I'd like to have a party where everyone makes their own. Until then, let's get this party started...


    Raw Vegan Sushi Rolls

    Ingredients
    • nori wraps
    • miso paste 
    • avocado
    • radish, julienned
    • cucumber - julienned
    • carrots - julienned
    • red bell pepper, sliced lengthwise
    • enoki mushrooms
    • pea shoots or sprouts of your choice
    • hemp hearts & sesame seed mix, about 1 tbsp each
    • use as much of each vegetable as you wish
    Dipping Sauce
    • 1 tablespoon Nama Shoyu, tamari, or soy sauce
    • 1 tablespoon apple cider vinegar
    • 1 teaspoon toasted sesame oil
    • 1 teaspoon scallions, sliced
    • 1/4 teaspoon cayenne, to taste

    Directions

    Start by spreading your miso paste along the edge of the nori sheet. Add some of the hemp hearts & sesame seed mixture to the miso paste, gently press so the seeds stay put. Next add some avocado and all the other ingredients as you wish. Finally, roll your roll and slice. After the first one, I improved immensely. Once you get the hang of it it's really easy. Have fun and....


    Enjoy!

    Back to top